Monitoring Your Solution

You can manage and monitor your solution through a variety of ways. The easiest way to monitor your solution is through the initial replication steps that appear on the MACHINE DASHBOARD tab of the newly added machineA physical or virtual computer., which displays a live list of replication action steps. You can monitor this list for successful replication or for any potential issues.

Replication Server Initiation and Communication

Initiating Data Replication Steps

When you first add machines to your CloudEndure Disaster RecoveryThe CloudEndure solution that enables the recovery or continuation of vital technology infrastructure and systems in case of a crippling event. or MigrationThe CloudEndure solution that allows you to move data, applications, and other business elements from an onsite network or a cloud environment to another physical location or cloud environment. solution, you will see the following screen within the MACHINE DASHBOARD of each newly added machineA physical or virtual computer., displaying the list of actions that CloudEndure performs during the replication process.

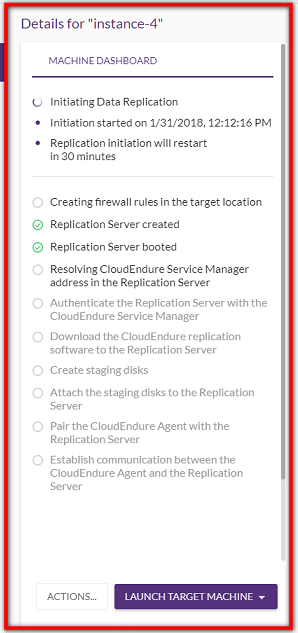
The list of replication actions is displayed in two cases:

The replication steps are the following (the steps involved in the automatic creation of a Replication ServerThe CloudEndure Machine to which Staging Disks are attached and to which data is replicated; launched on the Target location. in the Staging AreaA part of the Target location; includes the Replication Servers’ subnet, IPs, and the Replication Servers and their disks., over TCP Port 1500)

  1. Firewall rules created - Creating firewall rules in the TargetThe location where the Replication Server will be located and where Target machines will be created (as a result of Test, Cutover or Recovery). infrastructure.
  2. Replication Server created – the TargetThe location where the Replication Server will be located and where Target machines will be created (as a result of Test, Cutover or Recovery). infrastructure allocates a virtual machineA physical or virtual computer. for the creation of a Replication ServerThe CloudEndure Machine to which Staging Disks are attached and to which data is replicated; launched on the Target location.
  3. Replication Server booted – the allocated virtual machineA physical or virtual computer., which will function as a Replication ServerThe CloudEndure Machine to which Staging Disks are attached and to which data is replicated; launched on the Target location., is launched.
  4. Resolved CloudEndure Service Manager address in the Replication Server – until this stage, the CloudEndure Service ManagerThe CloudEndure server. communicated with the TargetThe location where the Replication Server will be located and where Target machines will be created (as a result of Test, Cutover or Recovery). infrastructure, and not directly with the Replication ServerThe CloudEndure Machine to which Staging Disks are attached and to which data is replicated; launched on the Target location.. Now, the launched Replication ServerThe CloudEndure Machine to which Staging Disks are attached and to which data is replicated; launched on the Target location. asks for the public IP address of the CloudEndure Service ManagerThe CloudEndure server. from the DNS server of the cloud, in order to communicate with it directly.
  5. Authenticated the Replication Server with the CloudEndure Service Manager – direct communication between the Replication ServerThe CloudEndure Machine to which Staging Disks are attached and to which data is replicated; launched on the Target location. and the CloudEndure Service ManagerThe CloudEndure server. is established.
  6. Downloaded the CloudEndure replication software to the Replication Server – the Replication ServerThe CloudEndure Machine to which Staging Disks are attached and to which data is replicated; launched on the Target location. contacts an external storage unit (Amazon S3) that stores CloudEndure replication softwareThe software that is downloaded from the Console by the Replication Servers. It runs on the Replication Servers and it is responsible for writing the replicated data to the Staging area disks., and downloads it. This replication softwareThe software that is downloaded from the Console by the Replication Servers. It runs on the Replication Servers and it is responsible for writing the replicated data to the Staging area disks. will write the incoming replicated data to the Replication ServerThe CloudEndure Machine to which Staging Disks are attached and to which data is replicated; launched on the Target location. disks. 
  7. Created staging disks - the Replication ServerThe CloudEndure Machine to which Staging Disks are attached and to which data is replicated; launched on the Target location. creates replication disks to store the incoming replicated data. The number of replication disks that are created depends on the size of the replicated data.
  8. Attached the staging disks to the Replication Server – in the previous step, the replication disks were created independently, without being attached to a specific Replication ServerThe CloudEndure Machine to which Staging Disks are attached and to which data is replicated; launched on the Target location.. Now, they are attached to a Replication ServerThe CloudEndure Machine to which Staging Disks are attached and to which data is replicated; launched on the Target location.
  9. Pair the CloudEndure Agent with the Replication Server –until now, the CloudEndure Service ManagerThe CloudEndure server. managed the communication between the AgentThe Agent is a software program that is installed on machines in the Source location that need to be migrated or replicated to the Target location. on the SourceThe location of the Source machine; Currently either a specific Region or Other Infrastructure. infrastructure and the Replication ServerThe CloudEndure Machine to which Staging Disks are attached and to which data is replicated; launched on the Target location. on the Target infrastructure. Now, the CloudEndure Service ManagerThe CloudEndure server. knows that all the initiation steps have been completed successfully. Therefore, it provides the AgentThe Agent is a software program that is installed on machines in the Source location that need to be migrated or replicated to the Target location. and the Replication ServerThe CloudEndure Machine to which Staging Disks are attached and to which data is replicated; launched on the Target location. information about each other, so that they could start communicating with each other directly.
  10. Establish communication between the CloudEndure Agent and the Replication Server – the AgentThe Agent is a software program that is installed on machines in the Source location that need to be migrated or replicated to the Target location. and the Replication ServerThe CloudEndure Machine to which Staging Disks are attached and to which data is replicated; launched on the Target location. begin communicating with each other directly over TCP Port 1500.

Data Replication Steps

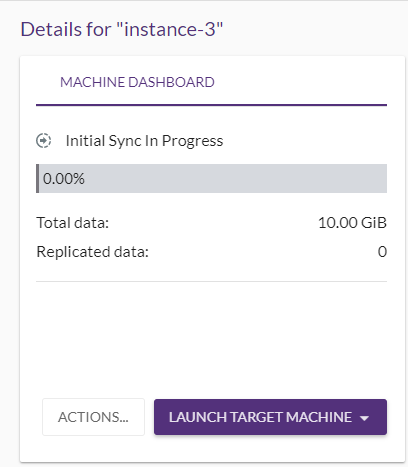
Once communication is established between the AgentThe Agent is a software program that is installed on machines in the Source location that need to be migrated or replicated to the Target location. and the Replication ServerThe CloudEndure Machine to which Staging Disks are attached and to which data is replicated; launched on the Target location., Data ReplicationThe process of copying all data blocks from selected disks on a Source Machine to Staging Disks. begins. The following are the Data ReplicationThe process of copying all data blocks from selected disks on a Source Machine to Staging Disks. steps:

  1. Replication Initiation/Initiating Data Replication
  2. Initial Sync – in this stage, the progress bar will appear. The block replication of the content of the Source machineThe computer, physical or virtual machine that needs to be protected by replication (Disaster Recovery) or migrated (Migration) The CloudEndure Agent is installed on the Source machine. will begin, and the content will be copied to the Staging AreaA part of the Target location; includes the Replication Servers’ subnet, IPs, and the Replication Servers and their disks.. (Recovery Points are created so it will be possible to continue the replication from the last point in case of a disconnect.) 


  3. Finalizing Initial Synchronization - once the Initial Sync reaches 100%, meaning, the data on the SourceThe location of the Source machine; Currently either a specific Region or Other Infrastructure. and the data on the TargetThe location where the Replication Server will be located and where Target machines will be created (as a result of Test, Cutover or Recovery). totally match and are in a complete synchronizationThe process of producing an exact copy of the Source contents on the Target., another state appears -  Finalizing Initial Sync. When reaching 100% for the first time, the machineA physical or virtual computer. will still not be launchable until (the Finalizing Initial Sync step consists of two sub-stages):

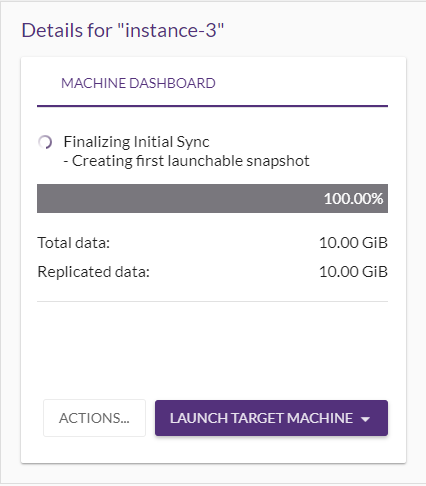
Once these steps are completed, the machineA physical or virtual computer. will be launchable and will show Continuous Data Protection (Disaster Recovery) or Continuous Data Replication (Migration) in its MACHINE DASHBOARD and under the DATA REPLICATION PROGRESS column on the Machines page.
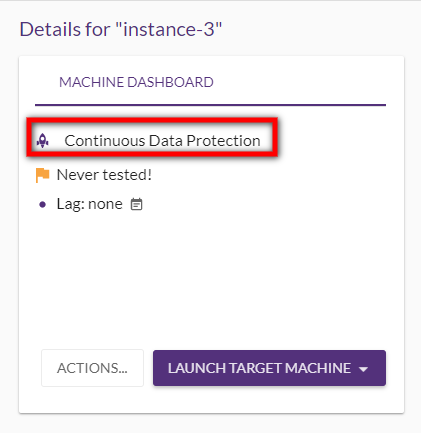

Troubleshooting Initial Replication Steps

Important! The information provided in this section is for general Troubleshooting guidance only. The information is provided on "AS IS" basis, with no guarantee of completeness, accuracy or timeliness, and without warranty or representations of any kind, expressed or implied. In no event will CloudEndure and/or its subsidiaries and/or their employees or service providers be liable to you or anyone else for any decision made or action taken in reliance on the information provided above or for any direct, indirect, consequential, special or similar damages (including any kind of loss), even if advised of the possibility of such damages. CloudEndure is not responsible for the update, validation or support of troubleshooting information.

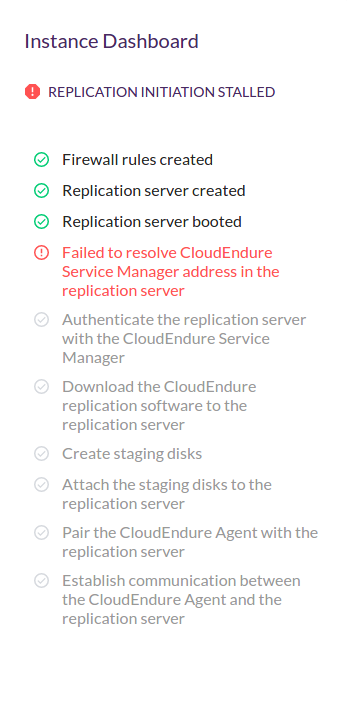
If one of the initial Data ReplicationThe process of copying all data blocks from selected disks on a Source Machine to Staging Disks. steps fails, an error message will appear, and the replication will become stalled.

When replication is stalled and then resumed, the replication will be restarted regardless of the stage in which it failed. Once a stalled replication is resumed, all replication steps are repeated. When the failed step is performed successfully, the replication status changes. Replication is successful once all replication steps have been successfully performed without a stall.

The following troubleshooting articles provide solutions for each potentially failed step:

Monitoring Replication Write Speed

The replication speed depends on 4 key factors: 

  1. The uplink speed from the machineA physical or virtual computer. to the Replication ServerThe CloudEndure Machine to which Staging Disks are attached and to which data is replicated; launched on the Target location. and bandwidth available.
  2. The overall disk storage.
  3. The changes in the disk while it is replicating.
  4. I/O speed of the storage itself.

To test your uplink speed, you can use the iperf3 utility, for example, as follows:

  1. Install a vanilla Linux machineA physical or virtual computer. (m4.xlarge) in the same subnet of the CloudEndure Replication ServersThe CloudEndure Machine to which Staging Disks are attached and to which data is replicated; launched on the Target location. 
  2. On that machineA physical or virtual computer., install iperf3 utility using:
    sudo apt-get install iperf3

    Note: If you're using Red Hat/CentOS use yum install instead. The epel-release package may be required. In that case, see Method 2 here.

  3. Then run:
    iperf3 -s -p 1500
  4. On your Source machineThe computer, physical or virtual machine that needs to be protected by replication (Disaster Recovery) or migrated (Migration) The CloudEndure Agent is installed on the Source machine., install iperf3 as well
    1. Windows: Download the right zip file from here and extract it.
    2. Linux: Install as mentioned above.
  5. Then, on terminal window run:
    iperf3.exe -i 10 -c [linux server ip] -p 1500 -t 60 -P 1

Here is a sample output:

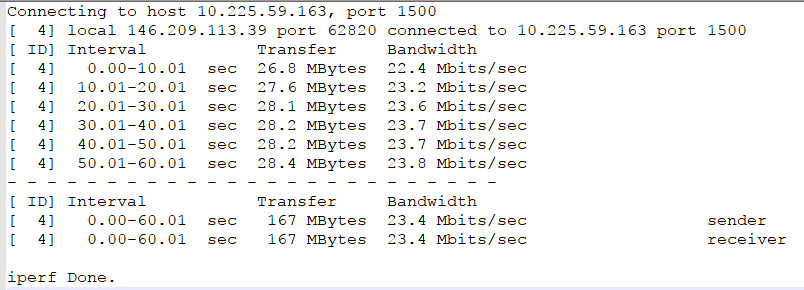
In this output, you can see that the uplink is 23.4Mbps which means that a 100GB (idle) server should be replicated in about 10 hours. You can use this calculator.

Note: If your server writes to disk an average of 20GB/day you need to take the following into account when calculating:
20GB/day --> ~2Mbps --> which leave us with only 21.4Mbps available for the initial 100GB.


©2020 COPYRIGHT CloudEndure - Terms of Service - Privacy Policy - AWS Vulnerability Reporting Guidelines - Report a Security Issue