
Note: These instructions focus on the Disaster Recovery solution, but the same concepts apply for Migration.
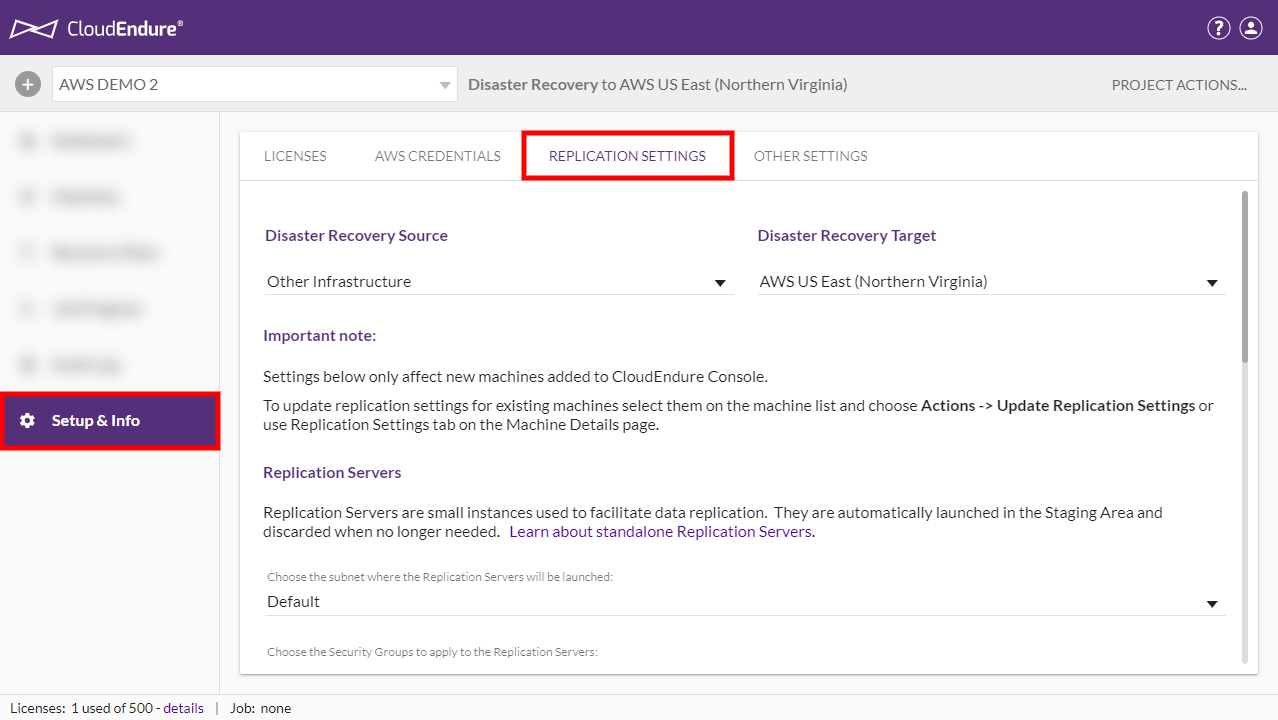
After entering your cloud credentials, you will need to set the settings of the replication process.
The REPLICATION SETTINGS page enables you to define your SourceThe location of the Source machine; Currently either a specific Region or Other Infrastructure. and TargetThe location where the Replication Server will be located and where Target machines will be created (as a result of Test, Cutover or Recovery). environments, and the default Replication ServersThe CloudEndure Machine to which Staging Disks are attached and to which data is replicated; launched on the Target location. in the Staging AreaA part of the Target location; includes the Replication Servers’ subnet, IPs, and the Replication Servers and their disks. of the TargetThe location where the Replication Server will be located and where Target machines will be created (as a result of Test, Cutover or Recovery). infrastructure.
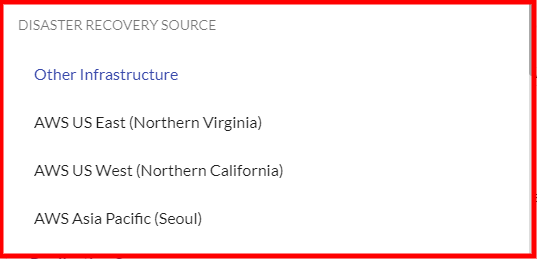
To define your SourceThe location of the Source machine; Currently either a specific Region or Other Infrastructure. infrastructure, select your current SourceThe location of the Source machine; Currently either a specific Region or Other Infrastructure. environment from the Migration/ Disaster Recovery Source drop-down list. You can choose from the following options:

Important! After selecting your SourceThe location of the Source machine; Currently either a specific Region or Other Infrastructure. and TargetThe location where the Replication Server will be located and where Target machines will be created (as a result of Test, Cutover or Recovery). infrastructures and beginning replicating your SourceThe location of the Source machine; Currently either a specific Region or Other Infrastructure. machines, you can opt to change your SourceThe location of the Source machine; Currently either a specific Region or Other Infrastructure. and TargetThe location where the Replication Server will be located and where Target machines will be created (as a result of Test, Cutover or Recovery). selections. However, you should take into consideration that your entire ProjectA Project is the basic organizational unit for running a CloudEndure solution. will be completely reset following a change in the SourceThe location of the Source machine; Currently either a specific Region or Other Infrastructure. or TargetThe location where the Replication Server will be located and where Target machines will be created (as a result of Test, Cutover or Recovery). infrastructures. This means that the replication will stop, the AgentsThe Agent is a software program that is installed on machines in the Source location that need to be migrated or replicated to the Target location. that are currently installed on your SourceThe location of the Source machine; Currently either a specific Region or Other Infrastructure. machines will be uninstalled, the SourceThe location of the Source machine; Currently either a specific Region or Other Infrastructure. machines will be disconnected from the CloudEndure Service ManagerThe CloudEndure server., and all the data that was replicated up to this point to the Staging AreaA part of the Target location; includes the Replication Servers’ subnet, IPs, and the Replication Servers and their disks. will be deleted. Therefore, it is crucial to carefully select your SourceThe location of the Source machine; Currently either a specific Region or Other Infrastructure. and TargetThe location where the Replication Server will be located and where Target machines will be created (as a result of Test, Cutover or Recovery). infrastructures from the very start.
When selecting an AWS region as both a SourceThe location of the Source machine; Currently either a specific Region or Other Infrastructure. and a TargetThe location where the Replication Server will be located and where Target machines will be created (as a result of Test, Cutover or Recovery). infrastructure, the entire SourceThe location of the Source machine; Currently either a specific Region or Other Infrastructure. AWS environment is replicated to the TargetThe location where the Replication Server will be located and where Target machines will be created (as a result of Test, Cutover or Recovery). infrastructure. This replicated environment includes any AWS settings you defined in the VPC of the SourceThe location of the Source machine; Currently either a specific Region or Other Infrastructure. infrastructure. The following environments are replicated in AWS to AWS replication:
If your SourceThe location of the Source machine; Currently either a specific Region or Other Infrastructure. machines reside in an AWS region, you can select either the Other Infrastructure option or the specific AWS region as the SourceThe location of the Source machine; Currently either a specific Region or Other Infrastructure. infrastructure. Generally, it is recommended to use the Other Infrastructure option for replicating SourceThe location of the Source machine; Currently either a specific Region or Other Infrastructure. machines from an AWS region, when you do NOT want to replicate the entire SourceThe location of the Source machine; Currently either a specific Region or Other Infrastructure. AWS environment, but only the SourceThe location of the Source machine; Currently either a specific Region or Other Infrastructure. machines themselves. More specifically, use the Other Infrastructure option for replicating SourceThe location of the Source machine; Currently either a specific Region or Other Infrastructure. machines from an AWS region in the following cases:
For Disaster RecoveryThe CloudEndure solution that enables the recovery or continuation of vital technology infrastructure and systems in case of a crippling event. ProjectsA Project is the basic organizational unit for running a CloudEndure solution. that protect source instances located in an AWS RegionA Region denotes a geographical area (US east, EU west, etc.). Each Region has multiple, isolated locations known as Zones. Zones are isolated from one another, but Zones within the same Region are connected through low-latency links. Cloud Regions exist in AWS, Microsoft Azure, and GCP., ensure that you do not use Other Infrastructure and use AWS as the TargetThe location where the Replication Server will be located and where Target machines will be created (as a result of Test, Cutover or Recovery). infrastructure instead (AWS to AWS).
If you select a AWS region as your SourceThe location of the Source machine; Currently either a specific Region or Other Infrastructure. infrastructure, verify the following:
Note: When migrating or recovering from one AWS Account into another AWS Account, select the Other Infrastructure option.
Note: When migrating or recovering from a commercial region to a GovCloud region, select the Other Infrastructure option.
Note: If you select one of the AWS regions as your Source infrastructure, all of the disks of each of your Source machines will be replicated and you will not be able to select a subnet during Agent installation.
Note: If you select one of AWS regions as your Source infrastructure, you have additional options for configuring the blueprint of its machines.
To define your TargetThe location where the Replication Server will be located and where Target machines will be created (as a result of Test, Cutover or Recovery). infrastructure select the AWS region that will serve as the TargetThe location where the Replication Server will be located and where Target machines will be created (as a result of Test, Cutover or Recovery). to which you want to replicate your data from the Migration/Disaster Recovery Target drop-down list.

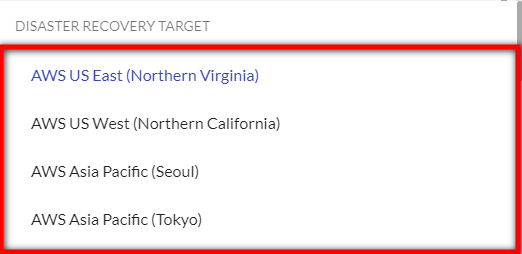
Note: Only AWS regions that are allowed by your AWS account and IAM policy will be displayed.
After selecting your SourceThe location of the Source machine; Currently either a specific Region or Other Infrastructure. and TargetThe location where the Replication Server will be located and where Target machines will be created (as a result of Test, Cutover or Recovery). infrastructures and regions, you will need to define your default Replication ServersThe CloudEndure Machine to which Staging Disks are attached and to which data is replicated; launched on the Target location..

Select the Default instance type or choose a custom instance type.

Note: CloudEndure uses a t3.small instance type as the default. Selecting a larger instance type may accrue additional costs.
Note: Changing the Replication Server instance type will not affect replication. Replication will automatically continue using the new instance type from where it left off.
Note: Replication Servers are automatically assigned a public IP address from Amazon's public IP space.
Note: This feature is only available when the Source infrastructure is either Other Infrastructure or vCenter.
Choose the converter instance type for the CloudEndure machineA physical or virtual computer. conversion server. This is the server that converts the disks to boot and run in the TargetThe location where the Replication Server will be located and where Target machines will be created (as a result of Test, Cutover or Recovery). infrastructure.
You can either choose to use the default instance type (m5.large or m4.large, depending on the Availability ZoneA Region denotes a geographical area (US east, EU west, etc.). Each Region has multiple, isolated locations known as Zones. Zones are isolated from one another, but Zones within the same Region are connected through low-latency links. Cloud Regions exist in AWS, Microsoft Azure, and GCP.) or you can choose any other instance type if the default instance type is causing issues on the EC2 side, capacity issues, or isn't supported by the Availability ZoneA Region denotes a geographical area (US east, EU west, etc.). Each Region has multiple, isolated locations known as Zones. Zones are isolated from one another, but Zones within the same Region are connected through low-latency links. Cloud Regions exist in AWS, Microsoft Azure, and GCP.. 
Check this option if you would like to use a Dedicated Replication ServerThe CloudEndure Machine to which Staging Disks are attached and to which data is replicated; launched on the Target location.. This will dedicate a single Replication ServerThe CloudEndure Machine to which Staging Disks are attached and to which data is replicated; launched on the Target location. for each Source machineThe computer, physical or virtual machine that needs to be protected by replication (Disaster Recovery) or migrated (Migration) The CloudEndure Agent is installed on the Source machine., instead of a single Replication ServerThe CloudEndure Machine to which Staging Disks are attached and to which data is replicated; launched on the Target location. for multiple SourceThe location of the Source machine; Currently either a specific Region or Other Infrastructure. machines.
The instance type you selected under the Choose the Replication Server instance type category will automatically become dedicated.

Note: CloudEndure uses a M5.xlarge instance type as the default Dedicated Replication Server. Ensure that you select a specific instance type under the Choose the Replication Server instance type category if you do not want to use M5.xlarge.
Note: This field only appears on the individual machine Replication Settings.
The Automatic disk detection field shows whether you have automatic disk detection enabled.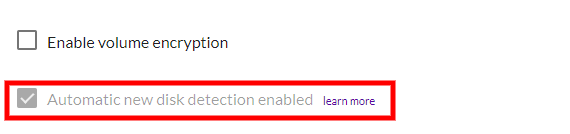
The CloudEndure AgentThe Agent is a software program that is installed on machines in the Source location that need to be migrated or replicated to the Target location. now automatically detects newly added disks on your Source machineThe computer, physical or virtual machine that needs to be protected by replication (Disaster Recovery) or migrated (Migration) The CloudEndure Agent is installed on the Source machine. after installation and adds them to the CloudEndure Console. Each newly added disk will trigger a rescan. Disk detection may take up to 15 minutes.
The automatic disk detection function is enabled by default for any AgentThe Agent is a software program that is installed on machines in the Source location that need to be migrated or replicated to the Target location. that was installed through the standard flow. You can disable automatic disk detection through additional installation options.
Note: Using the --force-volumes flags or selecting specific volumes for replication (as opposed to replicating all volumes) will disable automatic disk detection.
To ensure that automatic disk detection is enabled - reinstall any Agent that was installed prior to the 13th of February, 2021 (02/13/2021).
Note: The automatic disk detection feature is on by default for AWS to AWS Projects. Customers that are migrating or recovering from AWS to AWS do not need to reinstall the Agent for the feature to work.
Select your preferred default disk type to be used by the Replication ServersThe CloudEndure Machine to which Staging Disks are attached and to which data is replicated; launched on the Target location. in the Staging AreaA part of the Target location; includes the Replication Servers’ subnet, IPs, and the Replication Servers and their disks.. You can either select the Use fast SSD data disks or the Use slower, low cost standard data disks option.

You can additionally select the preferred default disk type under the Staging Area Disks > Choose which disk type to use for each of the source disks header of individual machineA physical or virtual computer. Replication SettingsIn the Console UI, a set of settings affecting the data replication process, including Replication Servers subnet and IP, data throttling, use dedicated replicator, use multiple connections, etc.. Here, you have the option to choose the exact EBS volume type to use for each source disk in the machineA physical or virtual computer.. Each disk has minimum and maximum sizes and varying performance metrics and pricing. You can learn more about Amazon EBS volume types here.
Note: Changing the default disk type will cause a resync.
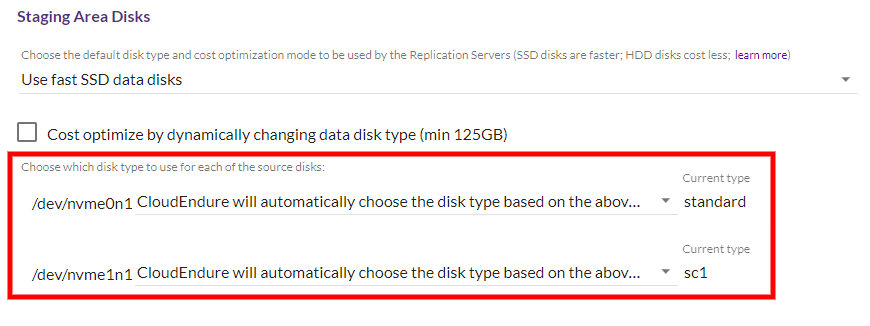
If you select the CloudEndure will automatically choose the disk type based on the above setting option, then the Console will automatically use the appropriate volume based on whether you selected to use fast SSD disks or slower, lower cost standard disks.
Note: Existing GP2 volumes will be automatically converted to GP3 volumes whenever the CloudEndure Agent needs to reconnect to the Replication Server.
Note: CloudEndure utilizes EBS Magnetic volumes for disks that are smaller than 500 GiB in both cases as it is the most cost-effective and efficient option.
CloudEndure uses a single Replication ServerThe CloudEndure Machine to which Staging Disks are attached and to which data is replicated; launched on the Target location. per 15 source disks. Selecting the CloudEndure will automatically... option will use the least amount of replication serversThe CloudEndure Machine to which Staging Disks are attached and to which data is replicated; launched on the Target location. (replication sharding), resulting in increased cost savings.
Choose the Cost optimize by dynamically changing data disk type (min 125 GB) option for additional cost savings. 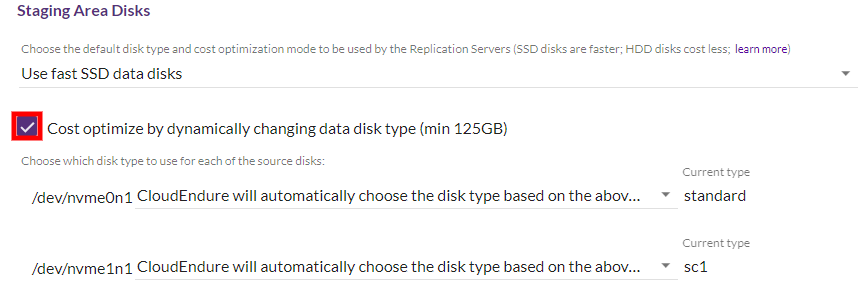
When enabled, CloudEndure will use low cost sc1 or st1 disks for replication when possible. CloudEndure will automatically identify when sc1 or st1 disks can be used for cost reduction. You will be able to select whether to use sc1 or st1 disks for each applicable volume. If the throughput of the sc1 or st1 disk is not high enough for the required change rate in the source server disk, then CloudEndure will use the default disk type.
Note: This feature only works for disks that are larger or equal to 125 GB. Smaller disks will use the default disk type.
Important: Ensure that you update your IAM Policy for CloudEndure to the latest policy (last updated June, 2021) for this feature to work. You will receive the following error upon saving your Replication SettingsIn the Console UI, a set of settings affecting the data replication process, including Replication Servers subnet and IP, data throttling, use dedicated replicator, use multiple connections, etc. if you do not have the latest policy: 
The disk type used in all scenarios will always be displayed under Current type.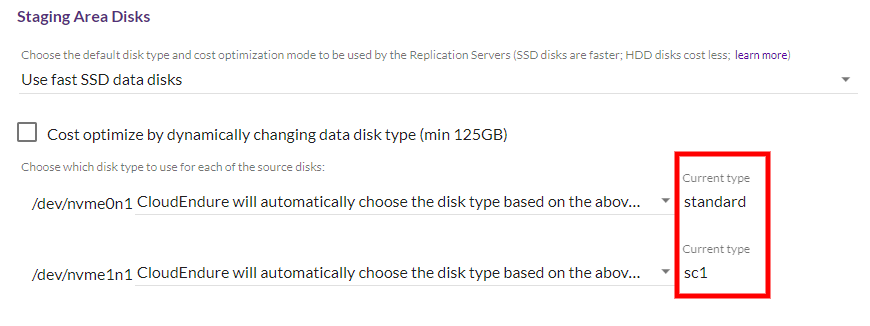
Note: All of the Replication Settings need to be identical for each machine in order for them to use the same Replication Server.
For example, If you already use an SSD for one machine, you may want to consider using it for other machines in order to maximize the usage of the Replication Server.
Note: If you have a Source disk that has a high write rate - you want to use a faster disks. If you have an extremely high write rate - use the highest-performance IOPS SSD option.
Note: Certain disk options require you to assign provisioned IOPS to the disk. The maximum ratio of provisioned IOPS to requested volume size (in GiB) is 50:1 for io1 volumes and 500:1 for io2 volumes.
Note: The gp3 disk options allows you to set the throughput of the disk. The maximum throughput per volume is 1,000 MB/s.
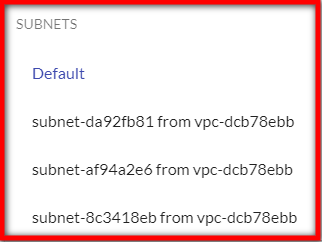
On the Replication Servers section, set the Subnet of the Staging AreaA part of the Target location; includes the Replication Servers’ subnet, IPs, and the Replication Servers and their disks. under the Choose the subnet where the Replication Servers will be launched: .

From the drop-down list, select the subnet you want to designate as the Staging AreaA part of the Target location; includes the Replication Servers’ subnet, IPs, and the Replication Servers and their disks. for the Replication ServersThe CloudEndure Machine to which Staging Disks are attached and to which data is replicated; launched on the Target location..
Note: You can safely switch between subnets in individual machine Replication Settings even after the replication has started. This switch will only cause a short pause in the replication and will not have any long-term effect on the replication.
Note: To replicate to a specific zone, select a subnet in that zone.
The Default subnet is the subnet that is allocated to you by AWS. If a default subnet does not exist, select a specific subnet. The other subnets in the drop-down list are the subnets that are automatically allocated by AWS to the region you selected.
Note: You can view the list of available subnets on the AWS console by navigating to each region through the dropdown on the top navigation menu..png)
Using the AWS console, you can create additional subnets in the selected region, and use them for the Staging AreaA part of the Target location; includes the Replication Servers’ subnet, IPs, and the Replication Servers and their disks.. The subnets that you create via the AWS console, will appear on the Subnet drop-down list in the CloudEndure User ConsoleCloudEndure SaaS User Interface. A web-based UI for setting up, managing, and monitoring the Migration and Disaster Recovery solutions..
On the Replication Servers section, set the Security GroupThe Security Group is an AWS feature that acts as a virtual firewall, which controls the inbound and outbout traffic of the Staging area. of the Staging AreaA part of the Target location; includes the Replication Servers’ subnet, IPs, and the Replication Servers and their disks..
A Security GroupThe Security Group is an AWS feature that acts as a virtual firewall, which controls the inbound and outbout traffic of the Staging area. acts as a virtual firewall, which controls the inbound and outbound traffic of the Staging AreaA part of the Target location; includes the Replication Servers’ subnet, IPs, and the Replication Servers and their disks..
From the drop-down list, select the Security Group you want to apply to the Staging AreaA part of the Target location; includes the Replication Servers’ subnet, IPs, and the Replication Servers and their disks..
The list of available Security Groups changes according to the subnet you selected in the previous field. You can add Security Groups via the AWS console, and they will appear on the Security Group drop-down list in the CloudEndure User ConsoleCloudEndure SaaS User Interface. A web-based UI for setting up, managing, and monitoring the Migration and Disaster Recovery solutions..
Learn more about Security Groups and AWS.
By default, CloudEndure creates a Security GroupThe Security Group is an AWS feature that acts as a virtual firewall, which controls the inbound and outbout traffic of the Staging area. for each Staging AreaA part of the Target location; includes the Replication Servers’ subnet, IPs, and the Replication Servers and their disks. subnet. This Default CloudEndure Security Group opens on the Staging AreaA part of the Target location; includes the Replication Servers’ subnet, IPs, and the Replication Servers and their disks. the following ports:
You can use the Default CloudEndure Security Group, or you can select another Security GroupThe Security Group is an AWS feature that acts as a virtual firewall, which controls the inbound and outbout traffic of the Staging area. for your purposes. However, take into consideration that any selected Security GroupThe Security Group is an AWS feature that acts as a virtual firewall, which controls the inbound and outbout traffic of the Staging area. that is not the default, will be added to the Default group, since the default Security GroupThe Security Group is an AWS feature that acts as a virtual firewall, which controls the inbound and outbout traffic of the Staging area. is essential for the operation of your solution.
Note: The default CloudEndure Security Group is named "CloudEndure Replicator Security Group."
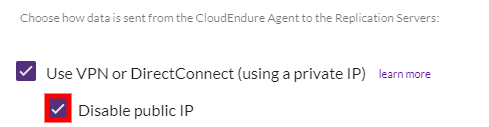
[Optional] On the Replication Servers section, select whether you would like to use a public or private network for sending the replicated data from the SourceThe location of the Source machine; Currently either a specific Region or Other Infrastructure. machines to the Staging AreaA part of the Target location; includes the Replication Servers’ subnet, IPs, and the Replication Servers and their disks.. Check the box to the left of the Use VPN… option to use a private network.

Note: You can use this option only if you already have a VPN, DirectConnect, or another type of existing private connection. Checking this box will not create a new private connection. It is recommended to use this option if you want to:
Note: The Use VPN… field will show different options based on your setup (in the screenshot above, the DirectConnect option is shown.)
By default, the replicated data is sent from the SourceThe location of the Source machine; Currently either a specific Region or Other Infrastructure. infrastructure to the Staging AreaA part of the Target location; includes the Replication Servers’ subnet, IPs, and the Replication Servers and their disks. over a public network, using the public IP of the Staging AreaA part of the Target location; includes the Replication Servers’ subnet, IPs, and the Replication Servers and their disks.. The transferred data is protected in transit. Prior to moving the data to the Staging AreaA part of the Target location; includes the Replication Servers’ subnet, IPs, and the Replication Servers and their disks., it is encrypted on the SourceThe location of the Source machine; Currently either a specific Region or Other Infrastructure. infrastructure. Once the data arrives at the Staging AreaA part of the Target location; includes the Replication Servers’ subnet, IPs, and the Replication Servers and their disks., and before it is written to the disks, it is decrypted.
Note: When using AWS cloud as your Target infrastructure, you can also encrypt the replicated data on the disks of the Staging Area after the in-transit encryption is decrypted.
Note: You can safely switch between a private connection and a public one in individual machine Replication Settings by checking or clearing the Use VPN… box, even after replication has begun. This switch will only cause a short pause in replication, and will not have any long-term effect on the replication.
When the Use VPN... box is checked, you will have the option to disable the use of Public IPs. Public IPs are enabled by default.
Check the box to the left of Disable Public IP to disable the Public IP.
If you will be connecting to CloudEndure via a proxy server, you will need to define its URL and Port number.
Enter your proxy URL under the Define whether to route communication from the Replication Server via a proxy: field after the https://. Enter the port in the port field. .png)
You can encrypt your replicated data on the disks in the Staging AreaA part of the Target location; includes the Replication Servers’ subnet, IPs, and the Replication Servers and their disks.. You can have your data encrypted at rest by using the EBS encryption feature.
Important! It is highly recommended to set the encryption option before you start the replication process as changing the encryption option will cause replication to restart from scratch.
To use this feature, check the box to the left of Enable volume encryption.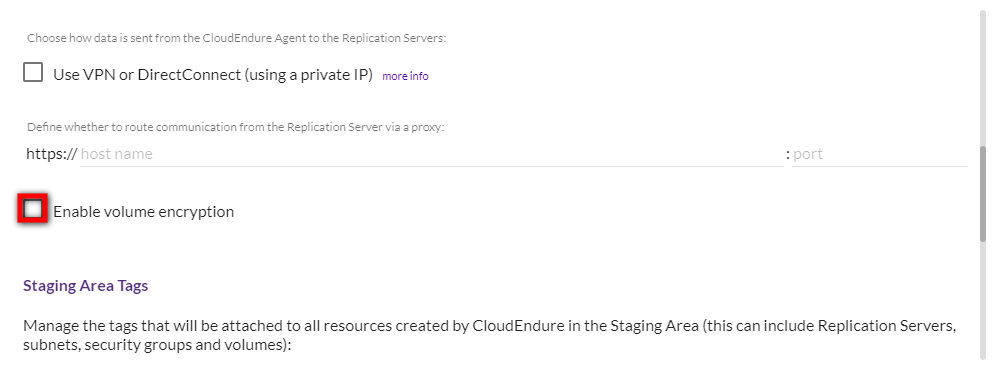
Once this option is enabled, the following field will appear: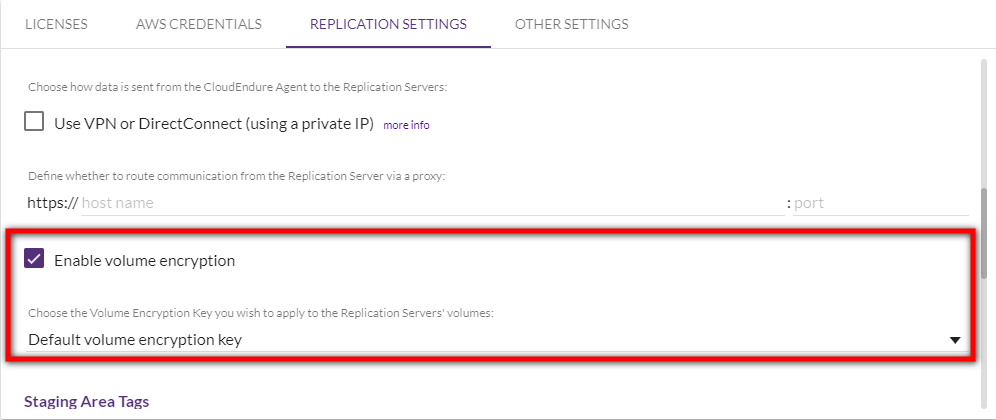
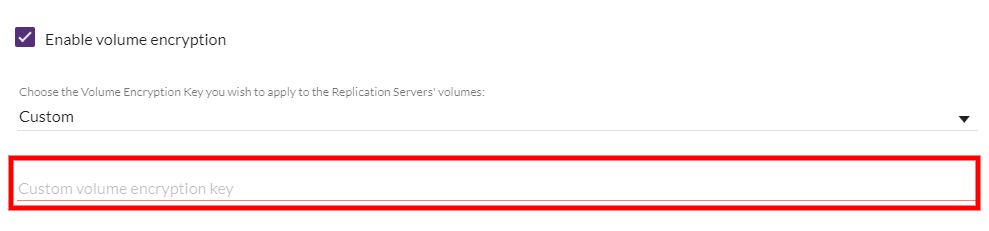
Choose the Volume Encryption Key you wish to apply to the Replication ServersThe CloudEndure Machine to which Staging Disks are attached and to which data is replicated; launched on the Target location.' volumes.

If you chose the Custom variable, then define the custom encyption key on the line below. If you have a Custom Managed key from a cross AWS AccountThe entity that signed up with CloudEndure., then enter the key with the full ARN (KMS Key example: arn:aws:kms:<region>:<AWS-AccountThe entity that signed up with CloudEndure.-ID>:key/123abcd-12ab-34cd-56ef-1234567890ab)
[Optional] On the Staging Area Tags section, set tags by defining their keys and values. Enter a Key and a Value into the corresponding fields.
Click the gray plus sign (+) to add more keys.
.png)
Note: The following tags are reserved by CloudEndure and cannot be used:
CloudEndure_Replication_Service
Management
Name
CloudEndure_Name
Note: Learn more about AWS tags.
The Network Bandwidth Throttling option allows you to regulate network traffic and minimize bandwidth congestion. Enable this option to if you want to control the transfer rate of data that is sent from the Source machineThe computer, physical or virtual machine that needs to be protected by replication (Disaster Recovery) or migrated (Migration) The CloudEndure Agent is installed on the Source machine. to the Staging AreaA part of the Target location; includes the Replication Servers’ subnet, IPs, and the Replication Servers and their disks. over TCP Port 1500. Once enabled, set the data transfer rate in Mbps. Uncheck the box next to Disabled to enable the option, then move the bar to set your throttling rate.
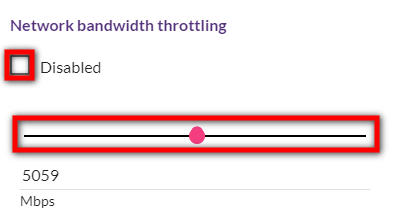
Note:This feature is not supported in China Region.
You can configure the location from where the Replication ServerThe CloudEndure Machine to which Staging Disks are attached and to which data is replicated; launched on the Target location. software will be downloaded.
By default, the software is downloaded from an S3 bucket residing on us-west-1-replicator-docker-console-v17.s3.amazonaws.com or eu-west-1-replicator-docker-console-v17.s3.amazonaws.com
Additionally, you have the option to download the software from the service endpoint (cached in CloudFront) from the console-static.cloudendure.com domain.
The switch can be performed through the CloudEndure Console within the Replication SettingsIn the Console UI, a set of settings affecting the data replication process, including Replication Servers subnet and IP, data throttling, use dedicated replicator, use multiple connections, etc..
Select the Use CloudEndure static endpoint for Replication Software Download box to download the software from the service endpoint.
Unselect the Use CloudEndure static endpoint for Replication Software Download box to download the software from the default download location - S3.

The switch between the two options can also be performed through the CloudEndure API.
Locate the "replicationSoftwareDownloadSource" field of the Machine object. By default, it will be set to "S3".
To download the Replication ServerThe CloudEndure Machine to which Staging Disks are attached and to which data is replicated; launched on the Target location. software from the CloudEndure service endpoint (via CloudFront) change the "S3" value to "service_endpoint".
Here are two sample API calls. The first one shows the configuration that causes the dockers to be downloaded from S3. The second shows the configuration that causes the dockers to be downloaded directly from CloudEndure. The replicationSoftwareDownloadSource field is marked in bold for your reference.
Downloading from S3:
GET https://console.cloudendure.com/api/v5/projects/xxxxxxxx-xxxx-xxxx-xxxx-xxxxxxxxxxxx/replicationConfigurations
{
"items": [
{
"archivingEnabled": false,
"bandwidthThrottling": 0,
"cloudCredentials": "xxxxxxxx-xxxx-xxxx-xxxx-xxxxxxxxxxxx",
"converterType": "Default",
"disablePublicIp": false,
"id": "xxxxxxxx-xxxx-xxxx-xxxx-xxxxxxxxxxxx",
"objectStorageLocation": "",
"proxyUrl": "",
"region": "xxxxxxxx-xxxx-xxxx-xxxx-xxxxxxxxxxxx",
"replicationServerType": "Default",
"replicationSoftwareDownloadSource": "S3",
"replicationTags": [],
"replicatorSecurityGroupIDs": [],
"storageLocationId": "",
"subnetHostProject": "",
"subnetId": "",
"useDedicatedServer": false,
"useLowCostDisks": false,
"usePrivateIp": false,
"volumeEncryptionAllowed": false,
"volumeEncryptionKey": ""
}
]
}
Downloading from CloudEndure:
GET https://console.cloudendure.com/api/v5/projects/xxxxxxxx-xxxx-xxxx-xxxx-xxxxxxxxxxxx/replicationConfigurations
{
"items": [
{
"archivingEnabled": false,
"bandwidthThrottling": 0,
"cloudCredentials": "xxxxxxxx-xxxx-xxxx-xxxx-xxxxxxxxxxxx",
"converterType": "Default",
"disablePublicIp": false,
"id": "xxxxxxxx-xxxx-xxxx-xxxx-xxxxxxxxxxxx",
"objectStorageLocation": "",
"proxyUrl": "",
"region": "xxxxxxxx-xxxx-xxxx-xxxx-xxxxxxxxxxxx",
"replicationServerType": "Default",
"replicationSoftwareDownloadSource": "service_endpoint",
"replicationTags": [],
"replicatorSecurityGroupIDs": [],
"storageLocationId": "",
"subnetHostProject": "",
"subnetId": "",
"useDedicatedServer": false,
"useLowCostDisks": false,
"usePrivateIp": false,
"volumeEncryptionAllowed": false,
"volumeEncryptionKey": ""
}
]
}
Important: This field is only relevant for Disaster RecoveryThe CloudEndure solution that enables the recovery or continuation of vital technology infrastructure and systems in case of a crippling event. ProjectsA Project is the basic organizational unit for running a CloudEndure solution..
CloudEndure allows you to manually configure the number of days for which point-in-time snapshots will be retained.
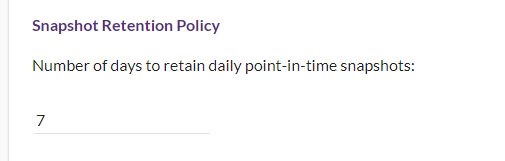
Note: The default value for new Projects in accounts opened after the 11th of April, 2021 is 7 days. The default value for both new Projects and existing Projects for accounts opened before the 11th of April, 2021 is 30 days.
Select a number between 1 and 90. The minimum number of days to save point-in-time snapshots for is 1, the maximum is 90.
Note: If you choose to reduce the number of point-in-time snapshots saved, that change will be implemented immediately. As a result, this will cause all existing point-in-time snapshots that do not fall within the newly configured day range to be deleted. The CloudEndure Console will warn you of the change upon saving the Replication Settings. Choose Confirm and Save Settings to confirm the change. 
Note:Increasing the number of days for which point-in-time snapshots will be retained will incur additional costs.
Once you have set all of your settings, click the SAVE REPLICATION SETTINGS button at the bottom of the page. 
You will now be able to add machines to your ProjectA Project is the basic organizational unit for running a CloudEndure solution.!
©2020 COPYRIGHT CloudEndure - Terms of Service - Privacy Policy - AWS Vulnerability Reporting Guidelines - Report a Security Issue