

Note: The CloudEndure vCenter Appliance only supports vCenter 6.5 and vCenter 6.7 as a Source.
Note: CloudEndure supports at least 30 source disks per every single vCenter Replication Server.
Note:You can use a single vCenter Appliance for multiple CloudEndure Projects.
Important! You can only use vCenterVMWare's virtual environment management platform. as a SourceThe location of the Source machine; Currently either a specific Region or Other Infrastructure. infrastructure with a Disaster RecoveryThe CloudEndure solution that enables the recovery or continuation of vital technology infrastructure and systems in case of a crippling event. ProjectA Project is the basic organizational unit for running a CloudEndure solution.! If you want to use vCenterVMWare's virtual environment management platform. as a SourceThe location of the Source machine; Currently either a specific Region or Other Infrastructure. with a MigrationThe CloudEndure solution that allows you to move data, applications, and other business elements from an onsite network or a cloud environment to another physical location or cloud environment. ProjectA Project is the basic organizational unit for running a CloudEndure solution., you can simply install the CloudEndure AgentThe Agent is a software program that is installed on machines in the Source location that need to be migrated or replicated to the Target location. on any vCenterVMWare's virtual environment management platform. machineA physical or virtual computer. and do not need to install the CloudEndure vCenterVMWare's virtual environment management platform. ApplianceThe CloudEndure vCenter Appliance. You must install the data center in order to use the CloudEndure solution..
Prior to using your CloudEndure solution with vCenterVMWare's virtual environment management platform., you will need to install the CloudEndure vCenterVMWare's virtual environment management platform. ApplianceThe CloudEndure vCenter Appliance. You must install the data center in order to use the CloudEndure solution. on your data center.
The CloudEndure vCenterVMWare's virtual environment management platform. ApplianceThe CloudEndure vCenter Appliance. You must install the data center in order to use the CloudEndure solution. acts as an access point between the CloudEndure service and your vCenterVMWare's virtual environment management platform., allowing you to control which vCenterVMWare's virtual environment management platform. resources are available to which CloudEndure ProjectA Project is the basic organizational unit for running a CloudEndure solution..
Important! When using vCenterVMWare's virtual environment management platform. as a SourceThe location of the Source machine; Currently either a specific Region or Other Infrastructure. infrastructure in a Disaster RecoveryThe CloudEndure solution that enables the recovery or continuation of vital technology infrastructure and systems in case of a crippling event. ProjectA Project is the basic organizational unit for running a CloudEndure solution., you need to perform an extra step in order to be able to perform a fully orchestrated Failback to a vCenterVMWare's virtual environment management platform. or AWS TargetThe location where the Replication Server will be located and where Target machines will be created (as a result of Test, Cutover or Recovery). infrastructure.

You need to set a VLANThe network within vCenter from which you want to launch the Replication Servers. for:
The VLANThe network within vCenter from which you want to launch the Replication Servers. for the vCenterVMWare's virtual environment management platform. appliance should be able to:
The network used for the CloudEndure ApplianceThe CloudEndure vCenter Appliance. You must install the data center in order to use the CloudEndure solution. should have network access to the HostThe physical data center within vCenter that serves as the replicator and as a Target. (or Hosts if using Clusters) where the Replication SettingsIn the Console UI, a set of settings affecting the data replication process, including Replication Servers subnet and IP, data throttling, use dedicated replicator, use multiple connections, etc. will be stored.
The VLANThe network within vCenter from which you want to launch the Replication Servers. used for the CloudEndure Replication ServersThe CloudEndure Machine to which Staging Disks are attached and to which data is replicated; launched on the Target location. should allow outbound access on port 1500 and have DHCP enabled (allowing for automatic allocation of IPs).
The network used for the CloudEndure ApplianceThe CloudEndure vCenter Appliance. You must install the data center in order to use the CloudEndure solution. should have network access to the HostThe physical data center within vCenter that serves as the replicator and as a Target. (or Hosts if using Clusters) where the Replication SettingsIn the Console UI, a set of settings affecting the data replication process, including Replication Servers subnet and IP, data throttling, use dedicated replicator, use multiple connections, etc. will be stored.
The AWS instance should:
The Replication ServerThe CloudEndure Machine to which Staging Disks are attached and to which data is replicated; launched on the Target location. network should have network access to vCenterVMWare's virtual environment management platform. in order to take snapshots.
Note: If you are using a proxy configuration, it needs to be in the following format (with the trailing "/"): https://PROXY_ADDR:PROXY_PORT/
Note:CloudEndure only supports private connections between and Agent and the Replication Server for vCenter as a Target or for Reverse Replication. Replication over public internet is not supported.
This video provides step-by-step instructions for installing the CloudEndure vCenterVMWare's virtual environment management platform. ApplianceThe CloudEndure vCenter Appliance. You must install the data center in order to use the CloudEndure solution. on your Data Center, in order to use vCenterVMWare's virtual environment management platform. as a source with CloudEndure.
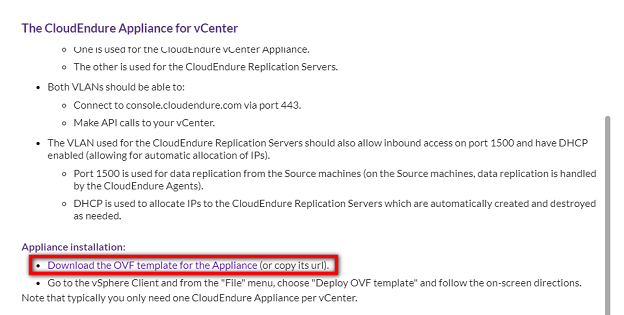
You can download the CloudEndure vCenterVMWare's virtual environment management platform. ApplianceThe CloudEndure vCenter Appliance. You must install the data center in order to use the CloudEndure solution. OVF Template at https://console.cloudendure.com/api/v5/appliance.ova
Note: CloudEndure requires Administrative access in order to create resources in vCenter. Customers that desire a more restrictive access credential-set can use the following:vcenter - administrator - no propagate
datacenter - administrator - no propagate
cluster - administrator - no propagate
ESXs on the cluster - administrator - no propagate
resource pool - administrator - propagate to children
Storage folder - administrator - propagate to children
Datastore - administrator - propagate to children
Distributed Switch Folder( where the DVS is located) - administrator - propagate to children
Note: Customers that are using VMC on AWS may experience replication issues due to VMC on AWS blocking connections to ESXi Servers. Attempt the troubleshooting step below after appliance installation if you are encountering replication issues.
Note: The examples in these instructions will utilize a Migration Project, but the steps for a Disaster Recovery Project are exactly the same.

.png)
.png)
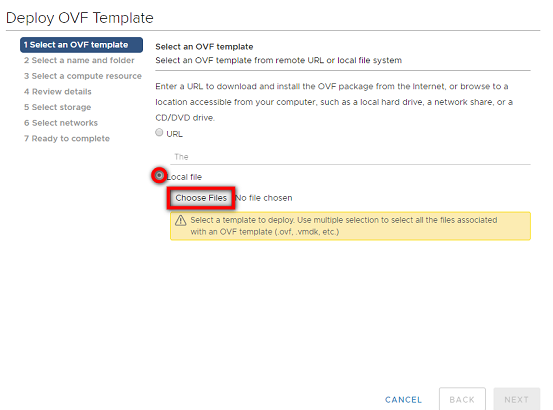
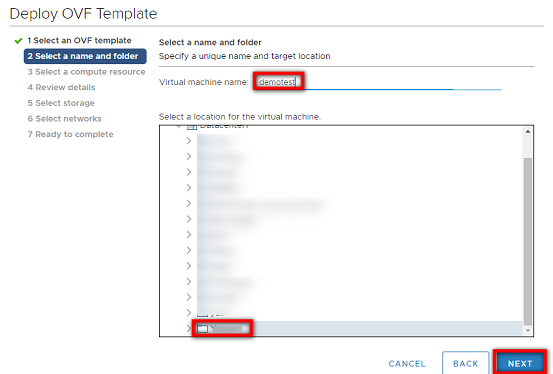
Note: CloudEndure recommends that you create a new Folder for this purpose by right clicking on your datacenter and then selecting New Folder.
.png)

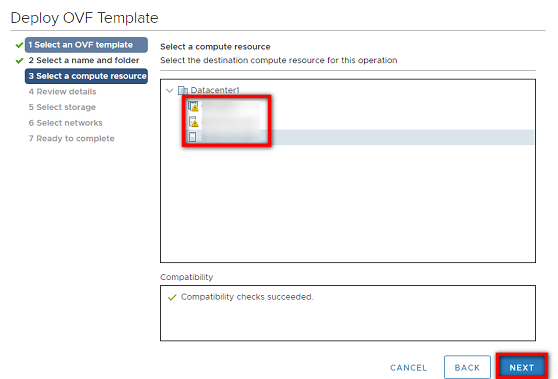
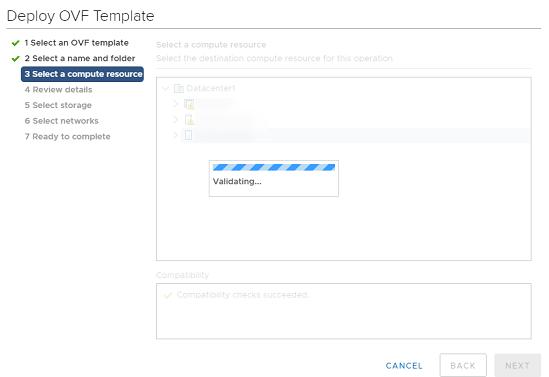
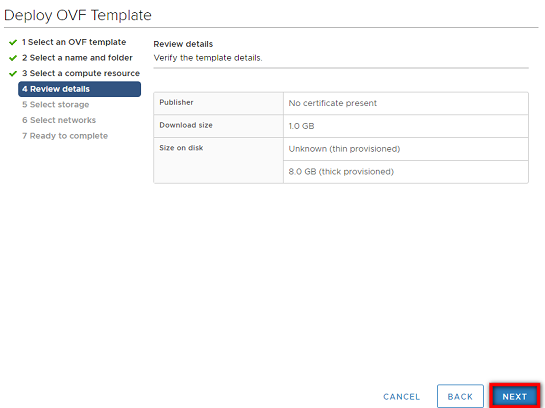
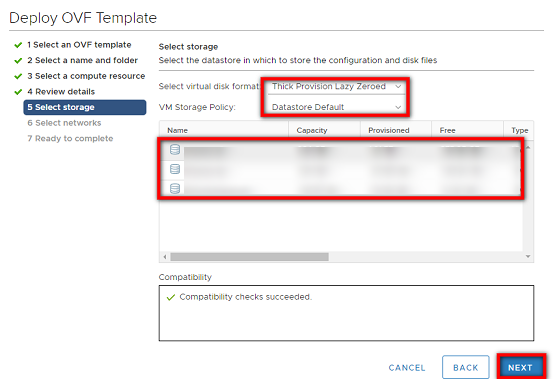
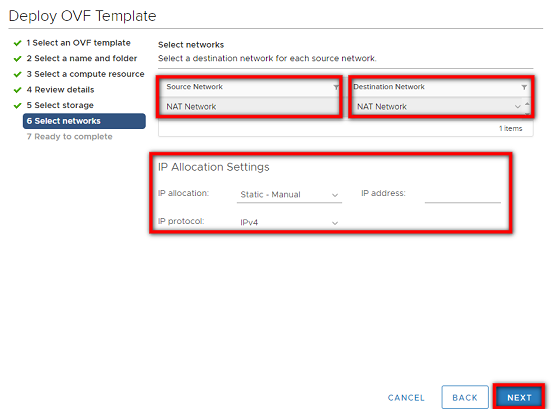
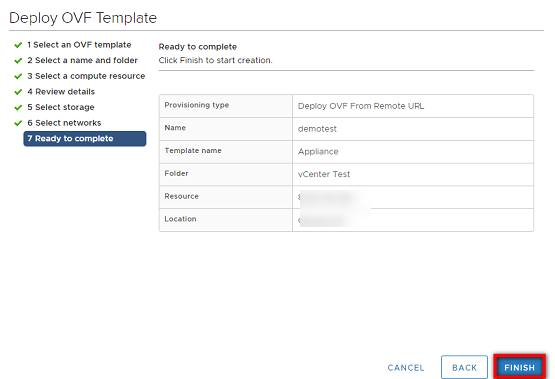

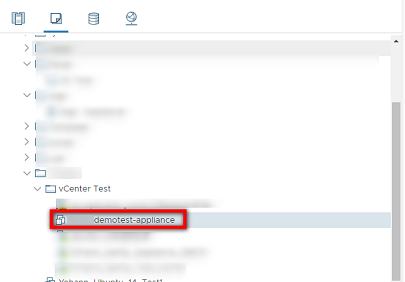

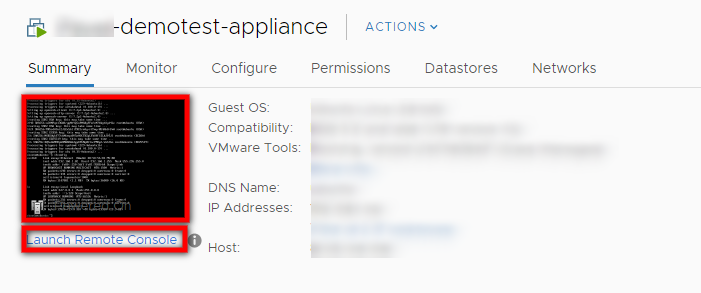
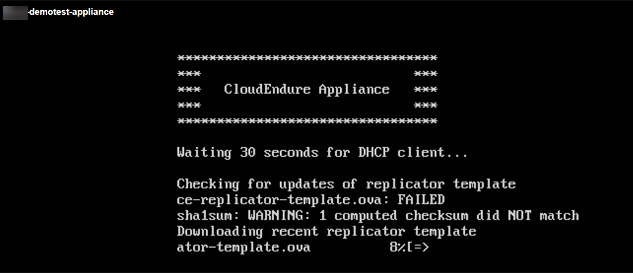
Note: If your appliance is not able to automatically connect to the CloudEndure servers, then it will ask you to manually configure your network settings. 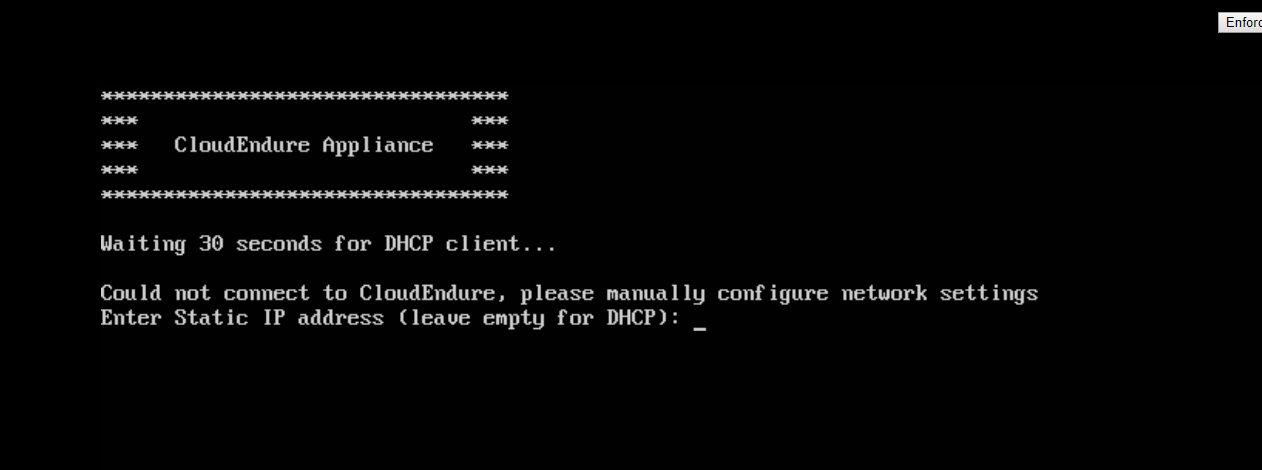

Note: You can find your Project Token by navigating to the CloudEndure User Console> Your vCenter Project >Setup & Info > OTHER SETTINGS > Installation Token.
Note: The vCenter virtual data center name is unique per each CloudEndure Account. Ensure that you enter a unique name that has not already been used for a different virtual data center in your account.
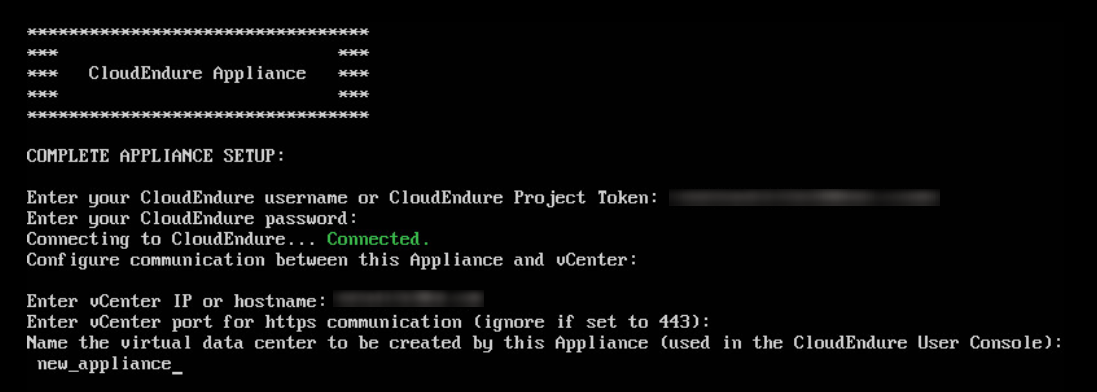
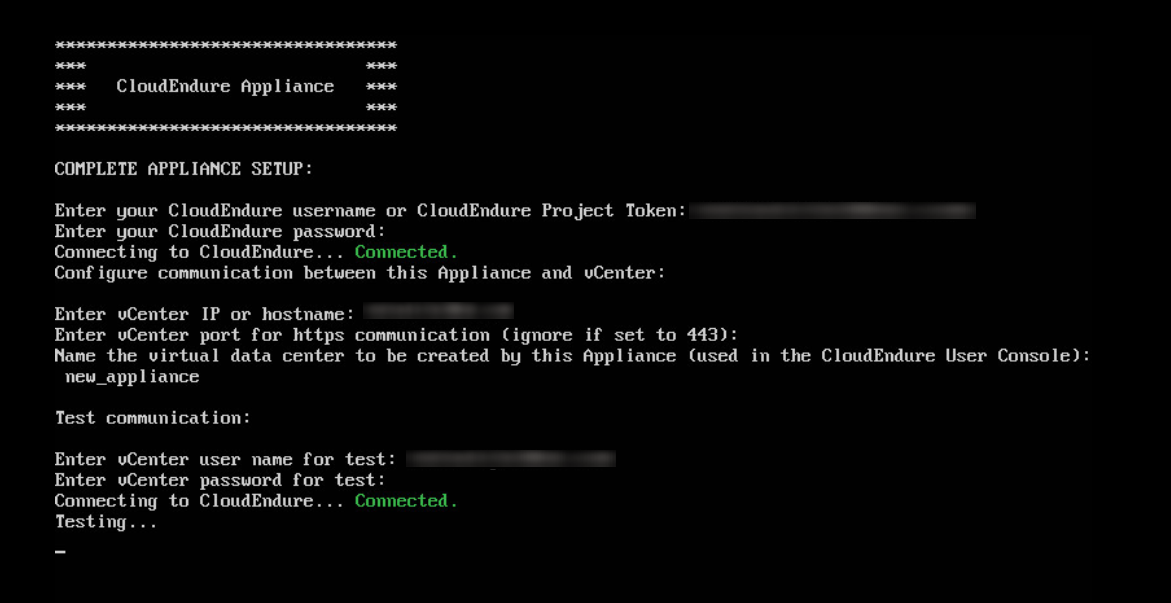
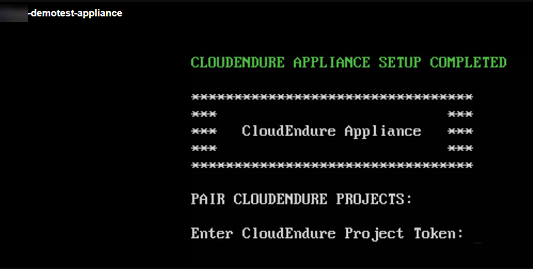
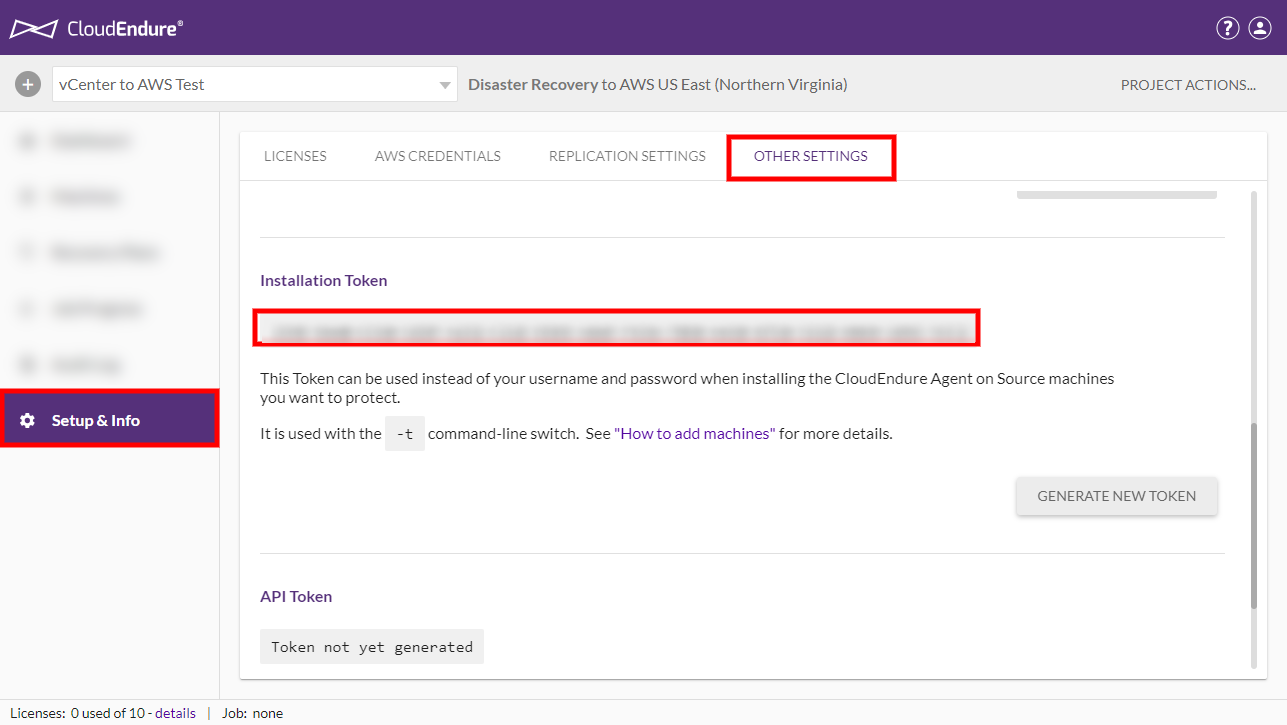


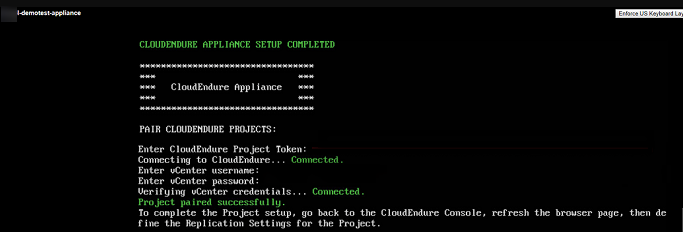
Note: Ensure that you properly label the CloudEndure Appliance that you have installed in the steps above in vCenter and leave the appliance running. Turning off or deleting the appliance will disable the CloudEndure solution.
Note: Typically, you only need to install a single CloudEndure Appliance per vCenter as Source and a single appliance per vCenter as a Target.
Note: Certain setups, such as those that use VMC on AWS, may encounter issues with replication. If the CloudEndure Console is unable to boot the Replication Server after appliance installation, attempt the troubleshooting fix found below.
After installing your CloudEndure vCenterVMWare's virtual environment management platform. ApplianceThe CloudEndure vCenter Appliance. You must install the data center in order to use the CloudEndure solution. on your data center, you will need to set the settings of the replication process.
Note: The Replication Settings options for the CloudEndure Migration and Disaster Recovery solutions are the same, yet you may want to set different settings for each solution, depending on your individual environment. These instructions will utilize the Migration interface for screenshot purposes.
You will need to define your Replication ServersThe CloudEndure Machine to which Staging Disks are attached and to which data is replicated; launched on the Target location. in order to utilize your CloudEndure solution.
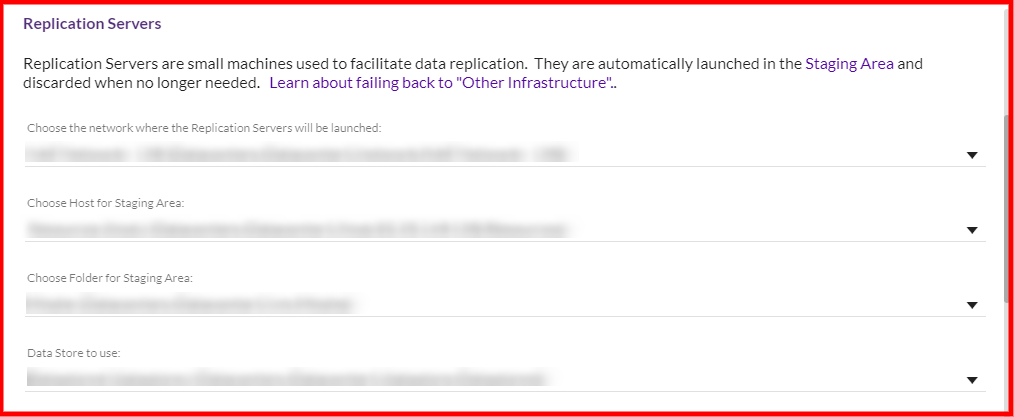
On the Replication Servers section, select the Network from which the Replication ServersThe CloudEndure Machine to which Staging Disks are attached and to which data is replicated; launched on the Target location. will be launched from the drop-down list. The Network is the network within vCenterVMWare's virtual environment management platform. from which you want to launch the Replication ServersThe CloudEndure Machine to which Staging Disks are attached and to which data is replicated; launched on the Target location..
Your options will be determined by your vCenterVMWare's virtual environment management platform. setup.
Note: Choose a choose a Network that matches the replication server network requirements.

Next, you will need to select the HostThe physical data center within vCenter that serves as the replicator and as a Target. for the Staging AreaA part of the Target location; includes the Replication Servers’ subnet, IPs, and the Replication Servers and their disks. from the drop-down menu. The HostThe physical data center within vCenter that serves as the replicator and as a Target. is the physical data center that you want to serve as the Replication ServerThe CloudEndure Machine to which Staging Disks are attached and to which data is replicated; launched on the Target location. and as the TargetThe location where the Replication Server will be located and where Target machines will be created (as a result of Test, Cutover or Recovery). for your SourceThe location of the Source machine; Currently either a specific Region or Other Infrastructure. machines.
Your options will be determined by your vCenterVMWare's virtual environment management platform. setup.

Next, you will need to select the Folder for the Staging AreaA part of the Target location; includes the Replication Servers’ subnet, IPs, and the Replication Servers and their disks. from the drop-down menu. Folders are organizational units within vCenterVMWare's virtual environment management platform..

Your options will be determined by your vCenterVMWare's virtual environment management platform. setup.

Next, you will need to select the Data StoreThe resource in vCenter from which machines are created. for the Staging AreaA part of the Target location; includes the Replication Servers’ subnet, IPs, and the Replication Servers and their disks. from the drop-down menu. The Data StoreThe resource in vCenter from which machines are created. is the resource from which you will create your machines.

Your options will be determined by your vCenterVMWare's virtual environment management platform. setup.
.png)
Note: You can confirm your Host, Networks, and Data Store by navigating to your vCenter appliance and looking at the values on the Related Objects section under the Summary tab. .png)

Note: All hosts that you want to replicate should have access to your chosen Data Store.
You can encrypt your replicated data on the disks in the Staging AreaA part of the Target location; includes the Replication Servers’ subnet, IPs, and the Replication Servers and their disks.. You can have your data encrypted at rest by checking the box next to the Enable volume encryption option.
Note: You must set up and deploy a Key Management Server within vCenter in order to use the Volume Encryption feature.
Important! It is highly recommended to set the encryption option before you start the replication process.
Once this option is enabled, the following field will appear:
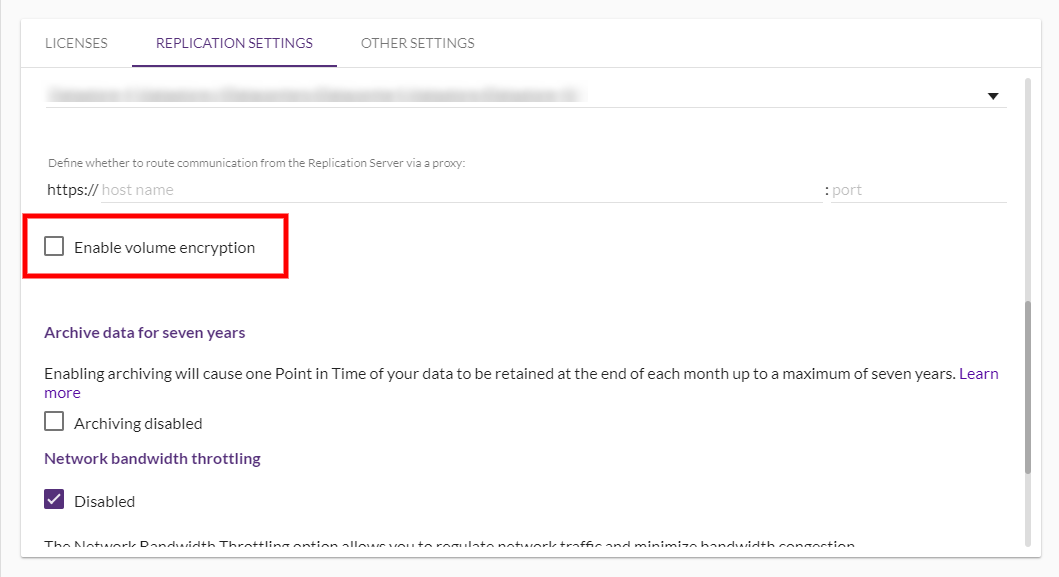
Check the box to the left of Enable volume encryption to enable the function.
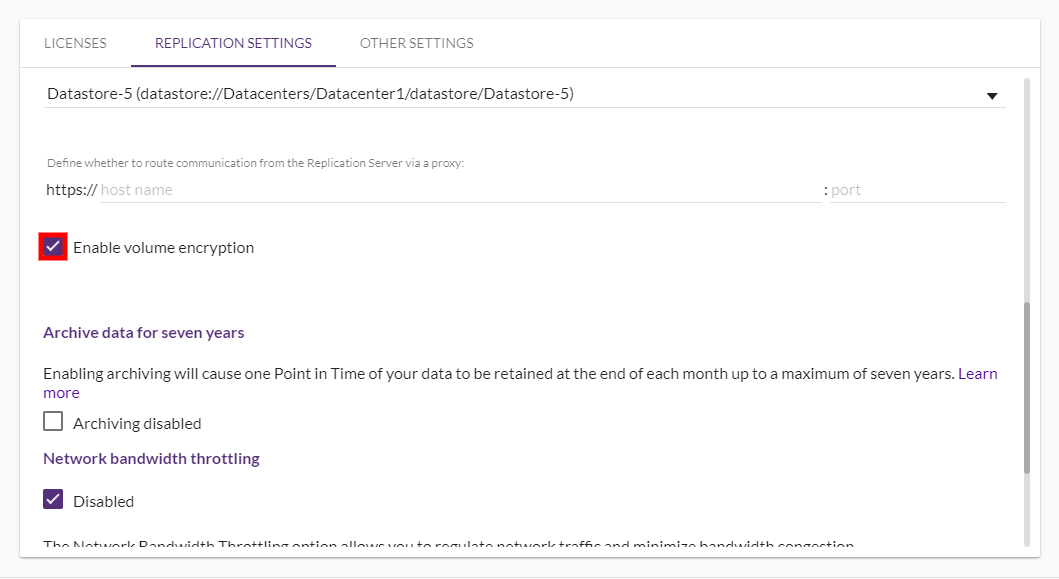
If you wish to route communications from the Replication ServerThe CloudEndure Machine to which Staging Disks are attached and to which data is replicated; launched on the Target location. via a proxy, you can define the proxy parameters by inputting the host name following the https:// and then the port following the :

Note: The proxy should provide access to both console.cloudendure.com and vCenter host.
The Network Bandwidth Throttling option allows you to regulate network traffic and minimize bandwidth congestion. Enable this option to if you want to control the transfer rate of data that is sent from the Source machineThe computer, physical or virtual machine that needs to be protected by replication (Disaster Recovery) or migrated (Migration) The CloudEndure Agent is installed on the Source machine. to the Staging AreaA part of the Target location; includes the Replication Servers’ subnet, IPs, and the Replication Servers and their disks. over TCP Port 1500.
Once enabled, set the data transfer rate in Mbps. Uncheck the box next to Disabled to enable the option, then move the bar to set your throttling rate.
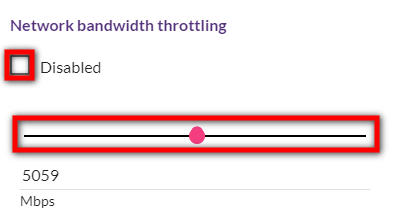
Note: This option is disabled by default.
Once you have set all of your settings, click the SAVE REPLICATION SETTINGS button at the bottom of the page. 
You will now be able to add machines to your ProjectA Project is the basic organizational unit for running a CloudEndure solution.!
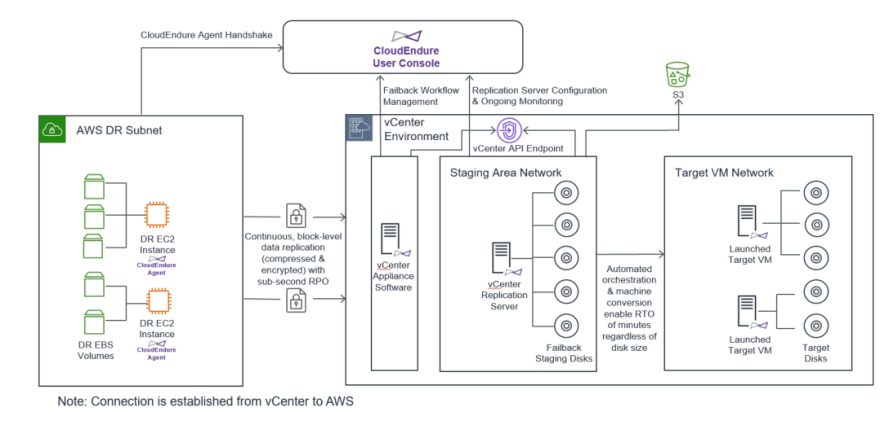
Note: If you plan to use CloudEndure’s orchestrated Failback from an AWS Source to an AWS Target, set the priority of any created network interfaces associated with Windows Target machines to ‘2’. This will prevent connectivity issues during the Failback process. Do this before directing traffic to the Target machine, as this network change may momentarily interrupt network connectivity.
 Target machine can be launched


Note: Any previous Target machines launched for the Source machines you are testing will be deleted.
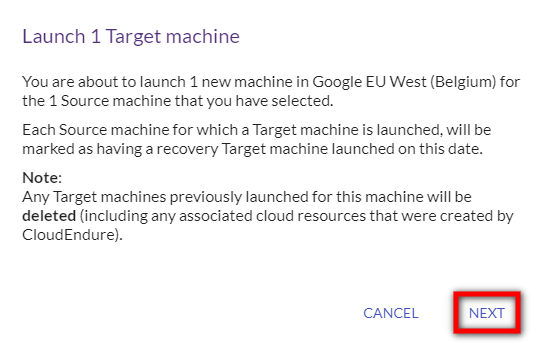
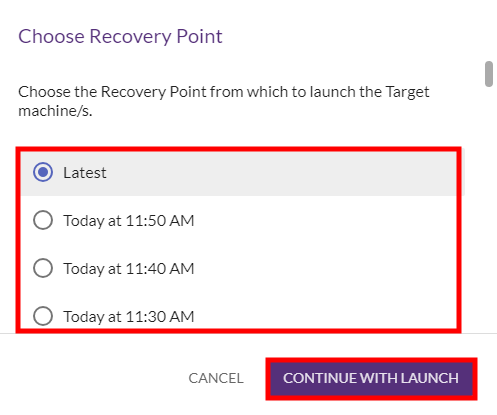

Note: You can view the progress of the Target machine launch by clicking on the Job Progress tab. 
The Job Progress window will appear, providing details for the Target machine launch process. 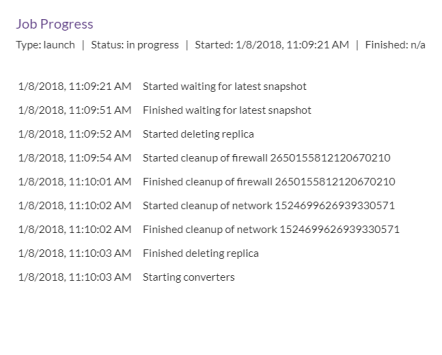

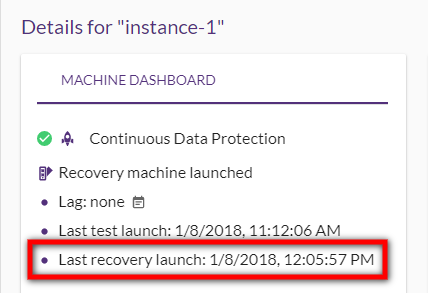
To Failover specific machines, you will need to create a new ProjectA Project is the basic organizational unit for running a CloudEndure solution. and configure it identically to your original DRThe CloudEndure solution that enables the recovery or continuation of vital technology infrastructure and systems in case of a crippling event. ProjectA Project is the basic organizational unit for running a CloudEndure solution. (same TargetThe location where the Replication Server will be located and where Target machines will be created (as a result of Test, Cutover or Recovery). region, license, credentials and Replication SettingsIn the Console UI, a set of settings affecting the data replication process, including Replication Servers subnet and IP, data throttling, use dedicated replicator, use multiple connections, etc..) Once you have the ProjectA Project is the basic organizational unit for running a CloudEndure solution. ready:
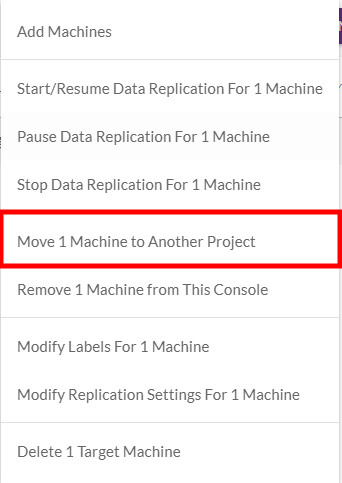
Note: If you were unable to move the machines, then the Project configurations are most likely not identical. Contact Support for additional help.
Note: If you have already launched a Target machine for the machine you are moving, then you do not need to launch a new Target machine after moving the machine to a new Project.
Note: This operation can only be performed from a vCenter Source to an AWS Target.
Note: In order to perform a fully orchestrated Failback from a vCenter Source, you must select vCenter as the Source infrastructure in your Replication Settings after installing the CloudEndure vCenter Appliance as described here.
Note:CloudEndure will always only replicate the deltas (changes) during Failback.
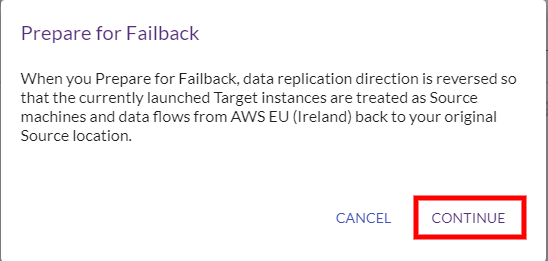
After performing a successful FailoverA backup operational mode in which the functions of a system component are assumed by secondary system components when the primary component becomes unavailable through either failure or scheduled down time., you will want to FailbackThe process of restoring operations to a primary machine or facility after they have been shifted to a secondary machine or facility during Failover. your machines. CloudEndure allows you to prepare for FailbackThe process of restoring operations to a primary machine or facility after they have been shifted to a secondary machine or facility during Failover. by reversing the direction of Data ReplicationThe process of copying all data blocks from selected disks on a Source Machine to Staging Disks. from the Target machineThe Machine created during Test, Cutover or Recovery. back to the Source machineThe computer, physical or virtual machine that needs to be protected by replication (Disaster Recovery) or migrated (Migration) The CloudEndure Agent is installed on the Source machine.. The CloudEndure User ConsoleCloudEndure SaaS User Interface. A web-based UI for setting up, managing, and monitoring the Migration and Disaster Recovery solutions. will then treat the currently launched TargetThe location where the Replication Server will be located and where Target machines will be created (as a result of Test, Cutover or Recovery). machines as SourceThe location of the Source machine; Currently either a specific Region or Other Infrastructure. machines and data will flow from your selected TargetThe location where the Replication Server will be located and where Target machines will be created (as a result of Test, Cutover or Recovery). infrastructure back to your original SourceThe location of the Source machine; Currently either a specific Region or Other Infrastructure. infrastructure.
Note: Traffic flow direction remains from the original Source site to the original Target site.
You can perform the Prepare for FailbackThe process of restoring operations to a primary machine or facility after they have been shifted to a secondary machine or facility during Failover. action by following these steps:
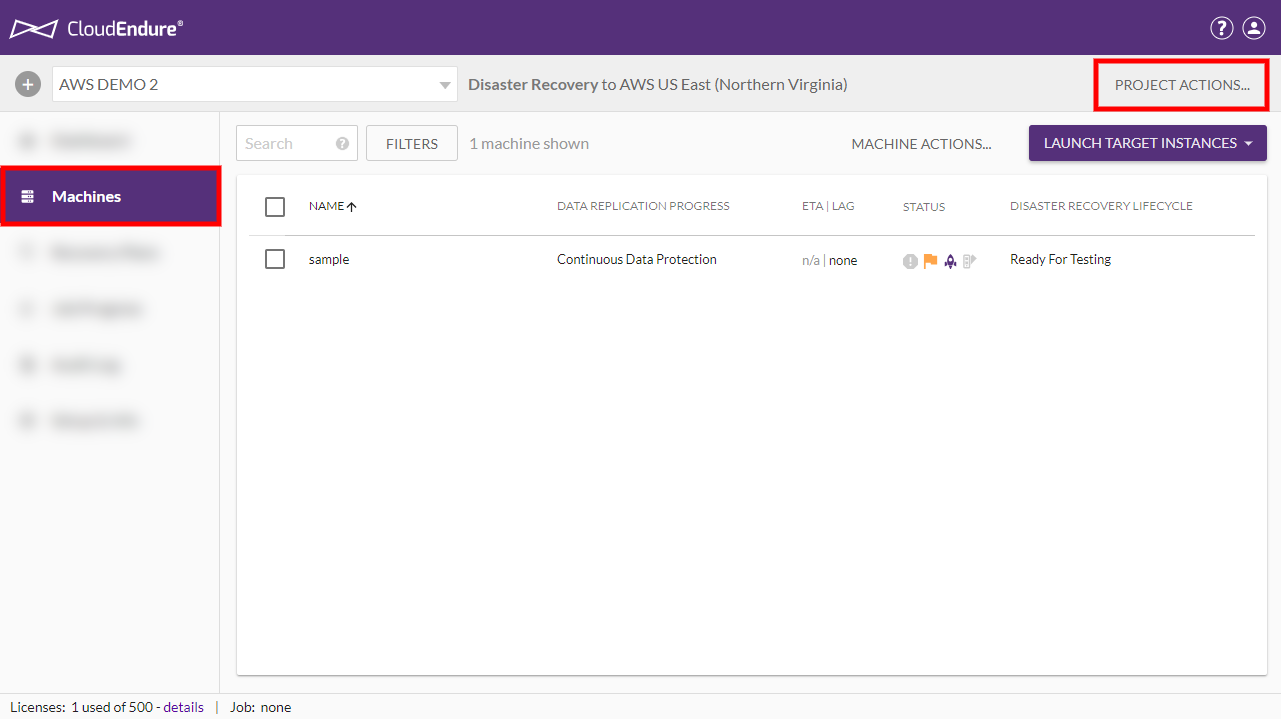
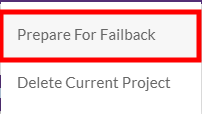
Note: You can only initiate the Prepare for Failback action once all of the Source machines in the Project have launched Target machines in either Test or Recovery mode.
.png)

You must edit the FailbackThe process of restoring operations to a primary machine or facility after they have been shifted to a secondary machine or facility during Failover. Settings of any ProjectA Project is the basic organizational unit for running a CloudEndure solution. prior to performing the FailbackThe process of restoring operations to a primary machine or facility after they have been shifted to a secondary machine or facility during Failover.. These settings will be used as a template for the Replication SettingsIn the Console UI, a set of settings affecting the data replication process, including Replication Servers subnet and IP, data throttling, use dedicated replicator, use multiple connections, etc. of each of your machines when you perform a FailbackThe process of restoring operations to a primary machine or facility after they have been shifted to a secondary machine or facility during Failover..
To change the FailbackThe process of restoring operations to a primary machine or facility after they have been shifted to a secondary machine or facility during Failover. settings, navigate to the Setup & Info tab on the left-hand navigation menu and click on FAILBACK SETTINGS.
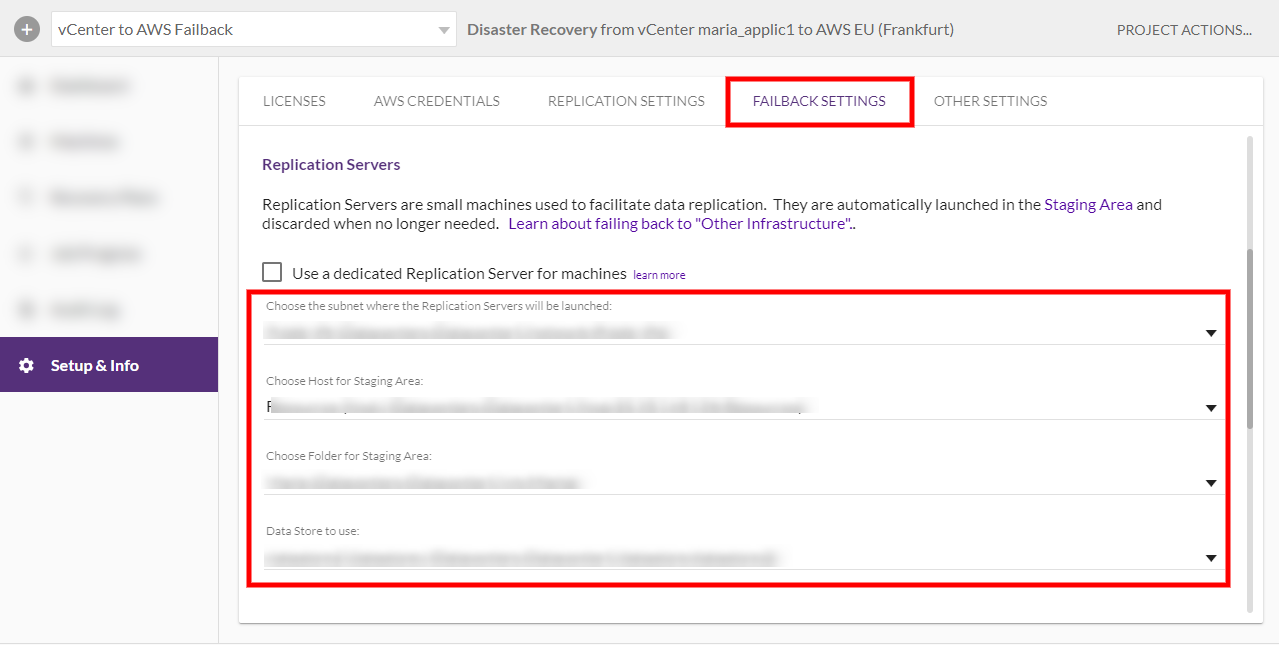

After performing the Prepare for FailbackThe process of restoring operations to a primary machine or facility after they have been shifted to a secondary machine or facility during Failover. action, you can edit the FailbackThe process of restoring operations to a primary machine or facility after they have been shifted to a secondary machine or facility during Failover. Settings and Back to Normal settings of your individual machines.
Click on the name of a machineA physical or virtual computer. to edit its FailbackThe process of restoring operations to a primary machine or facility after they have been shifted to a secondary machine or facility during Failover. Settings.

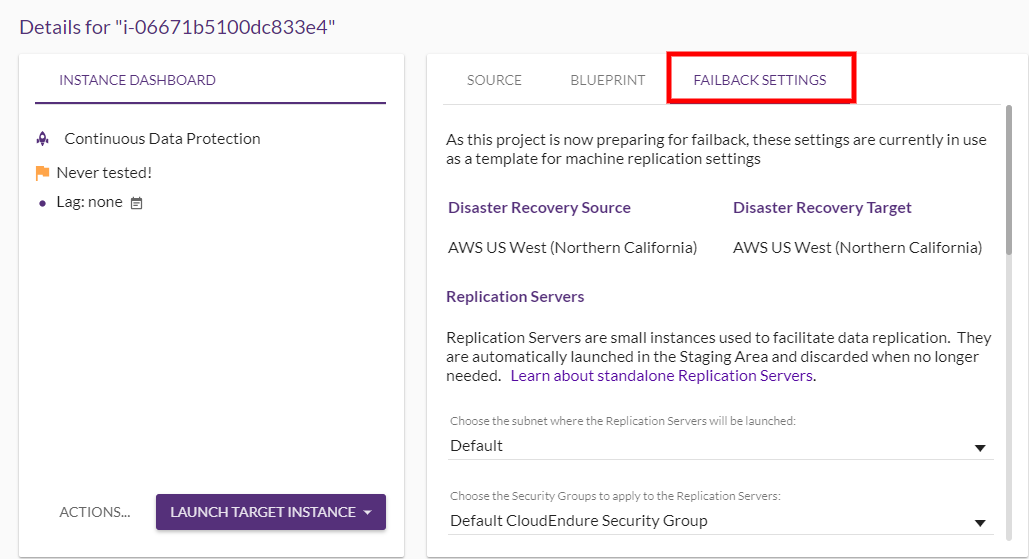
You can edit a variety of settings for the machineA physical or virtual computer.. These settings will be used as a template for machineA physical or virtual computer. replication settingsIn the Console UI, a set of settings affecting the data replication process, including Replication Servers subnet and IP, data throttling, use dedicated replicator, use multiple connections, etc.. The available settings differ based on your infrastructure. All settings can be changed other than the SourceThe location of the Source machine; Currently either a specific Region or Other Infrastructure. and TargetThe location where the Replication Server will be located and where Target machines will be created (as a result of Test, Cutover or Recovery).. You can learn more about platform-specific settings in the Replication Settings documentation. 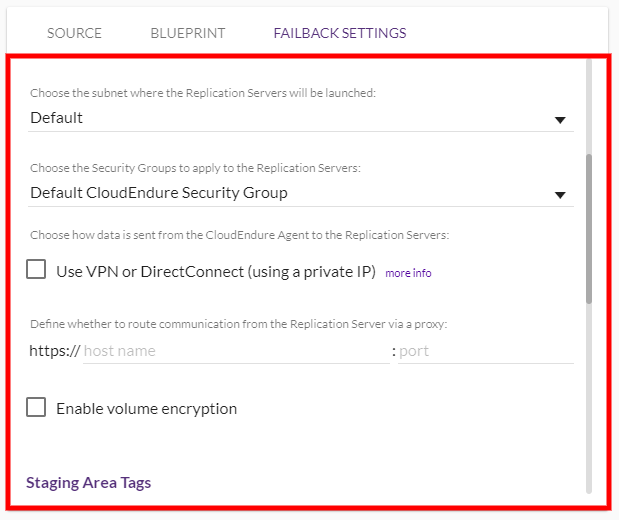


Note: Stop all operational services on the Source machine prior to Failback.
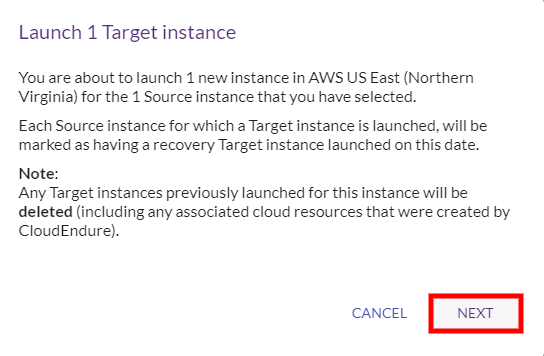
Note: Any previous Target machines launched for the Source machines you are testing will be deleted.
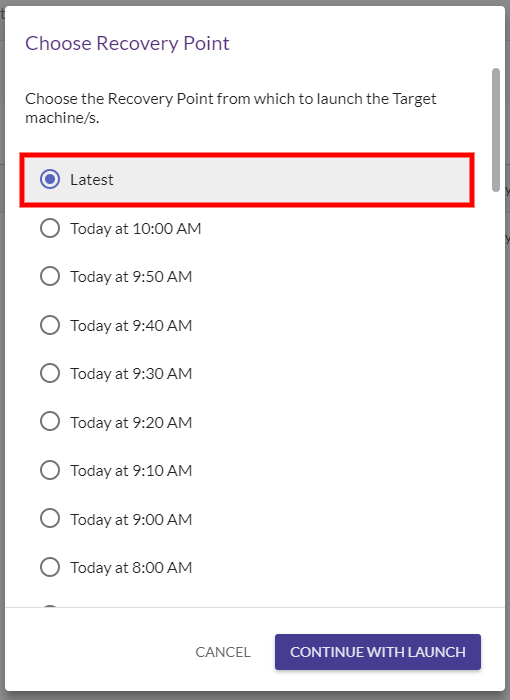
 (1).png)
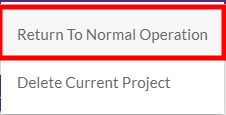
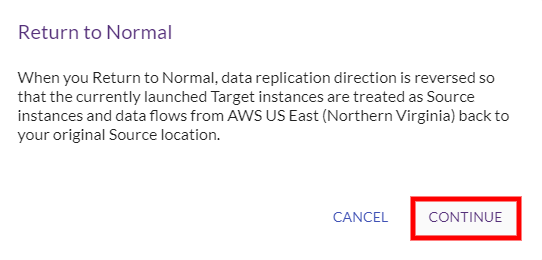


In certain cases, you may want to perform a failbackThe process of restoring operations to a primary machine or facility after they have been shifted to a secondary machine or facility during Failover. for a single machineA physical or virtual computer. (or various - but not all - machines) in a ProjectA Project is the basic organizational unit for running a CloudEndure solution. with multiple machines (vCenterVMWare's virtual environment management platform. SourceThe location of the Source machine; Currently either a specific Region or Other Infrastructure. to an AWS TargetThe location where the Replication Server will be located and where Target machines will be created (as a result of Test, Cutover or Recovery)..)
This can be achieved by moving the desired machines into a separate ProjectA Project is the basic organizational unit for running a CloudEndure solution. and performing the failbackThe process of restoring operations to a primary machine or facility after they have been shifted to a secondary machine or facility during Failover. as discussed in the Performing a Failback Using the CloudEndure Console section above.
You can move a Source machineThe computer, physical or virtual machine that needs to be protected by replication (Disaster Recovery) or migrated (Migration) The CloudEndure Agent is installed on the Source machine. from one ProjectA Project is the basic organizational unit for running a CloudEndure solution. to another. When a Source machineThe computer, physical or virtual machine that needs to be protected by replication (Disaster Recovery) or migrated (Migration) The CloudEndure Agent is installed on the Source machine. is moved to another ProjectA Project is the basic organizational unit for running a CloudEndure solution., the replication of its data continues without major interruptions (except for a small backlogAccumulation over time of changes in a Source machine, which are waiting to be replicated to the Target location.). A backlogAccumulation over time of changes in a Source machine, which are waiting to be replicated to the Target location. occurs, but no re-scan or sync is performed. The Blueprint of the machineA physical or virtual computer. is maintained without change.
In order to move a Source machineThe computer, physical or virtual machine that needs to be protected by replication (Disaster Recovery) or migrated (Migration) The CloudEndure Agent is installed on the Source machine. from one ProjectA Project is the basic organizational unit for running a CloudEndure solution. to another, the two ProjectsA Project is the basic organizational unit for running a CloudEndure solution. need to match. The criteria for matching ProjectsA Project is the basic organizational unit for running a CloudEndure solution. are as follows:
You cannot move a Source machineThe computer, physical or virtual machine that needs to be protected by replication (Disaster Recovery) or migrated (Migration) The CloudEndure Agent is installed on the Source machine. that is in the middle of a JobDesignates several procedures within the CloudEndure Console, including launching Test or Recovery machines, the deletion of Target machines, and other tasks. (launchingAfter the replication to the Staging area, launching is the process of setting up the Replication Servers, for Testing or Cutover and Recovery purposes. a TestThe same for Migration and Disaster Recovery. A process that is initiated manually. Launches Target machines on the Target location, and marks the tested machines on the Console as ready for Live Migration/Disaster Recovery. It is recommended to initiate a Test after the initial replication is completed. When a Test is initiated, an updated snapshot is created on the Staging Aaea. From this snapshot, a disk is created. or a Recovery machineA physical or virtual computer., deleting TargetThe location where the Replication Server will be located and where Target machines will be created (as a result of Test, Cutover or Recovery). machines), or if the AccountThe entity that signed up with CloudEndure. is currently being upgraded. If you want to move a Source machineThe computer, physical or virtual machine that needs to be protected by replication (Disaster Recovery) or migrated (Migration) The CloudEndure Agent is installed on the Source machine. to a ProjectA Project is the basic organizational unit for running a CloudEndure solution. that does not match its existing project, do the following:
Moving the Machines
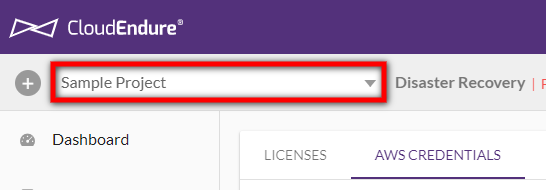
Note: You can move multiple machines at once by selecting them on the Machines page.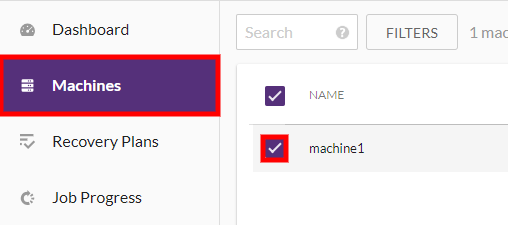
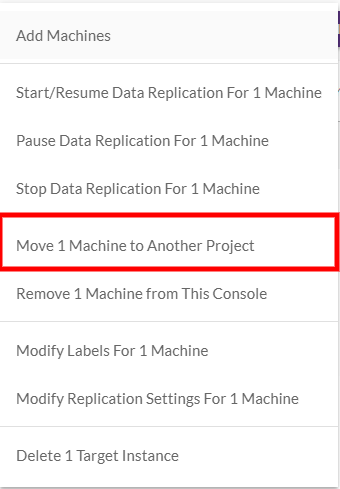
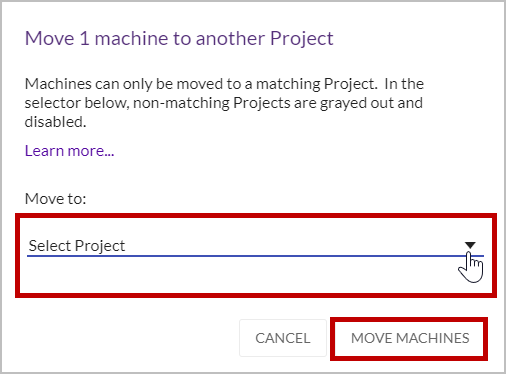
Note: Projects that are not listed do not match the criteria.

CloudEndure allows you to perform a scalable failbackThe process of restoring operations to a primary machine or facility after they have been shifted to a secondary machine or facility during Failover. for vCenterVMWare's virtual environment management platform. with the CloudEndure Mass FailbackThe process of restoring operations to a primary machine or facility after they have been shifted to a secondary machine or facility during Failover. Automation client (CEFA). This allows you to perform a one-click or custom failbackThe process of restoring operations to a primary machine or facility after they have been shifted to a secondary machine or facility during Failover. for multiple vCenterVMWare's virtual environment management platform. machines at once.
Note: The CEFA client was only tested on vCenter versions 6.7 and 7.0.
The following are the prerequisites for performing a Scalable FailbackThe process of restoring operations to a primary machine or facility after they have been shifted to a secondary machine or facility during Failover. with the CEFA client:
Note: If no attached CD ROM device is found, the CEFA client will attempt to add a CD ROM device.
The CEFA client was fully tested on Ubuntu 20.04 and an installation script for this version is provided. Use the following vanilla AMI or public ISO to run the client locally in your vCenterVMWare's virtual environment management platform. environment.
Follow the Create your EC2 resources and launch your EC2 instance guidelines as per the EC2 documentation. When asked to select an AMI, select the option below instead of the Amazon Linux 2 AMI and then proceed according to the documentation (step 3).

Once your VM instance is set up and ready, connect to the Ubuntu instance and run command prompt and download the CEFA client using the following command:
wget http://console.cloudendure.com/v5/static/install_scalable_failback.sh
Use the following commands to install the client:
bash install_scalable_failback.sh
Note: This command may ask for a sudo password if you use the Ubuntu ISO. Enter the password but DO NOT run this command as sudo.
source ~/.profile
rm install_scalable_failback.sh
The CEFA client will be installed in the scalable_failback directory.
cd into the scalable_failback directory and enter the following parameters in a single line, replace the defaults with your specific parameters and paths followed by the python start_scalable_failbackThe process of restoring operations to a primary machine or facility after they have been shifted to a secondary machine or facility during Failover..pyc command and press enter.
Note: You can find your Project Token by navigating to the CloudEndure User Console> Your vCenter Project >Setup & Info > OTHER SETTINGS > API Token.
You should enter all of the parameters in a single line. Once you have entered your parameters, enter the python start_scalable_failbackThe process of restoring operations to a primary machine or facility after they have been shifted to a secondary machine or facility during Failover..pyc command and press enter. The full parameters and command should look like the following example:CLOUDENDURE_FAILBACK_CLIENT_DATASTORE=Datastore-5 CLOUDENDURE_FAILBACK_CLIENT_PATH='path/failback_livecd.iso VCENTER_HOST=12.34.567.152 VCENTER_PORT=443 VCENTER_USER=sample@vsphere.local VCENTER_PASSWORD=samplepassword CLOUDENDURE_API_TOKEN=ABCD-EFGH-IJKL-MNOP-QRST-UVWX-YZ12-3456-7890-1112-1314-1516-1718-1920-2122-2334 python start_scalable_failback.pyc

Note: SSL verification is enabled by default. If you want to disable SSL verification, then add the following parameter: DISABLE_SSL_VERIFICATION=true
The CloudEndure Scalable FailbackThe process of restoring operations to a primary machine or facility after they have been shifted to a secondary machine or facility during Failover. client will connect to the CloudEndure Service ManagerThe CloudEndure server., verify that all dependencies are installed, and verify that the latest version of the CEFA client is installed.

Once the client has connected successfully and finished verification, select the One-Click Failback option under What would you like to do?

Select the CloudEndure ProjectA Project is the basic organizational unit for running a CloudEndure solution. within which you would like to perform a failbackThe process of restoring operations to a primary machine or facility after they have been shifted to a secondary machine or facility during Failover.. You can enter a keyword to filter by ProjectA Project is the basic organizational unit for running a CloudEndure solution. name or click Enter to see all ProjectsA Project is the basic organizational unit for running a CloudEndure solution..
Note: Only Disaster Recovery Projects will be shown.
Note: You can only perform a failback for a single Project at a time.

Select the ProjectA Project is the basic organizational unit for running a CloudEndure solution. and press Enter.

If the selected ProjectA Project is the basic organizational unit for running a CloudEndure solution. is not in Prepare for FailbackThe process of restoring operations to a primary machine or facility after they have been shifted to a secondary machine or facility during Failover. mode, the console will prompt you to change the ProjectA Project is the basic organizational unit for running a CloudEndure solution. to this mode. Choose Yes and then Choose Y to confirm.

Note: If the Project is in Prepare for Failback mode, the console will prompt you whether you want to skip machines that have already successfully started replication or restart replication for those machines. 
The client will initiate failbackThe process of restoring operations to a primary machine or facility after they have been shifted to a secondary machine or facility during Failover. for the ProjectA Project is the basic organizational unit for running a CloudEndure solution..

You can see the failbackThe process of restoring operations to a primary machine or facility after they have been shifted to a secondary machine or facility during Failover. progress within the CloudEndure Console.

During execution, the client will display the results of the failbackThe process of restoring operations to a primary machine or facility after they have been shifted to a secondary machine or facility during Failover.. The full results will be exported as a JSON file to the failbackThe process of restoring operations to a primary machine or facility after they have been shifted to a secondary machine or facility during Failover. client folder path under the results folder with the name of the ProjectA Project is the basic organizational unit for running a CloudEndure solution. and a time stamp.

The JSON file will display the following:

If failbackThe process of restoring operations to a primary machine or facility after they have been shifted to a secondary machine or facility during Failover. failed for any of your machines, you can troubleshoot the failure by looking at the machineA physical or virtual computer. configuration failbackThe process of restoring operations to a primary machine or facility after they have been shifted to a secondary machine or facility during Failover._hosts_settings.json file in the same folder.
Here, you can see the exact configurations of the failed machines. You can then fix any problems and use the custom failbackThe process of restoring operations to a primary machine or facility after they have been shifted to a secondary machine or facility during Failover. flow explained below to fail back these specific machines.
The custom failbackThe process of restoring operations to a primary machine or facility after they have been shifted to a secondary machine or facility during Failover. option gives you more control and flexibility over the failbackThe process of restoring operations to a primary machine or facility after they have been shifted to a secondary machine or facility during Failover. process. When utilizing the custom failbackThe process of restoring operations to a primary machine or facility after they have been shifted to a secondary machine or facility during Failover. option, you will first create a failbackThe process of restoring operations to a primary machine or facility after they have been shifted to a secondary machine or facility during Failover. configuration file, in which you can edit specific settings for each individual machineA physical or virtual computer., and you will then use this file to perform a failbackThe process of restoring operations to a primary machine or facility after they have been shifted to a secondary machine or facility during Failover. in a flow that is similar to that of the one-step failbackThe process of restoring operations to a primary machine or facility after they have been shifted to a secondary machine or facility during Failover..
To use the custom failbackThe process of restoring operations to a primary machine or facility after they have been shifted to a secondary machine or facility during Failover. option, you can either create a custom configuration JSON file or generate a default failbackThe process of restoring operations to a primary machine or facility after they have been shifted to a secondary machine or facility during Failover. configuration file through the client.
To generate a default failbackThe process of restoring operations to a primary machine or facility after they have been shifted to a secondary machine or facility during Failover. configuration file, once the client has connected successfully and finished verification, select the Generate a default failback configuration file option under What would you like to do?

Select the CloudEndure ProjectA Project is the basic organizational unit for running a CloudEndure solution. within which you would like to perform a failbackThe process of restoring operations to a primary machine or facility after they have been shifted to a secondary machine or facility during Failover.. You can enter a keyword to filter by ProjectA Project is the basic organizational unit for running a CloudEndure solution. name or click Enter to see all ProjectsA Project is the basic organizational unit for running a CloudEndure solution.. 
Note: Only Disaster Recovery Projects will be shown.
Note: You can only perform a failback for a single Project at a time.
Select the ProjectA Project is the basic organizational unit for running a CloudEndure solution. and press Enter.

The configuration file will be created as a JSON file to the failbackThe process of restoring operations to a primary machine or facility after they have been shifted to a secondary machine or facility during Failover. client folder path under the configurations folder with the following name: failbackThe process of restoring operations to a primary machine or facility after they have been shifted to a secondary machine or facility during Failover._hosts_settings-{project name}
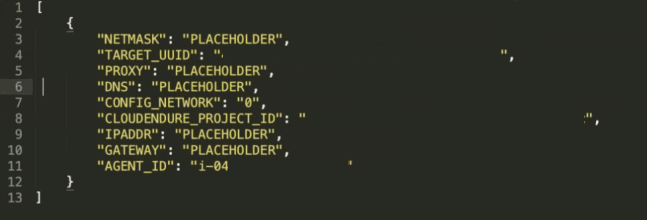
You can edit any of the fields in the file in order to correctly configure it. The file will display the following fields for each machineA physical or virtual computer.. You can edit every field to have absolute control over your failbackThe process of restoring operations to a primary machine or facility after they have been shifted to a secondary machine or facility during Failover. configuration for each machineA physical or virtual computer.. Ensure to save your changes.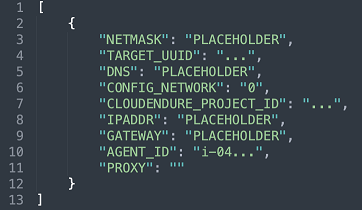
Note: The CONFIG_NETWORK value should be set to "0" if you are using DHCP. The value should beset to "1" if you want to manually configure the network settings. If CONFIG_NETWORK is set to "0", then the DNS, IPADDR, GATEWAY, NETMASK, and PROXY parameters are ignored but should not be deleted.
Note: If you are not using a proxy server, leave the PROXY field as an empty string, do not remove it.
Note: If you want to do any device mapping, you can add the DEVICE_MAPPING parameter. Example: “DEVICE_MAPPING”: “/dev/sda1:/dev/sda1,/dev/sda2:/dev/sda2"
Important! Ensure that the CloudEndure ProjectA Project is the basic organizational unit for running a CloudEndure solution. ID is the same for every machineA physical or virtual computer. you wish to failbackThe process of restoring operations to a primary machine or facility after they have been shifted to a secondary machine or facility during Failover. or the process will fail. You can only perform a failbackThe process of restoring operations to a primary machine or facility after they have been shifted to a secondary machine or facility during Failover. for one CloudEndure ProjectA Project is the basic organizational unit for running a CloudEndure solution. at a time.
Note: You can generate this file before or after the Project has performed a Failback. If you don't have targets launched, the file will still be generated, but the SOURCE MACHINE ID field will be a placeholder.
Once you are done editing your configuration file, rerun the CEFA client and select the Perform a Custom Failback option.

Select your configuration file. You can either define a custom path or select the default path that's automatically displayed by the client.

Select the configuration file you want to use.

Note: If the Project is in Prepare for Failback mode, the console will prompt you whether you want to skip machines that are already in failback or restart replication for those machines.

The client will initiate failbackThe process of restoring operations to a primary machine or facility after they have been shifted to a secondary machine or facility during Failover. for the ProjectA Project is the basic organizational unit for running a CloudEndure solution..

You can see the failbackThe process of restoring operations to a primary machine or facility after they have been shifted to a secondary machine or facility during Failover. progress within the CloudEndure Console.

Upon completion, the client will display the results of the failbackThe process of restoring operations to a primary machine or facility after they have been shifted to a secondary machine or facility during Failover.. The full results will be exported as a JSON file to the failbackThe process of restoring operations to a primary machine or facility after they have been shifted to a secondary machine or facility during Failover. client folder path under the results folder with the name of the ProjectA Project is the basic organizational unit for running a CloudEndure solution. and a time stamp.

The JSON file will display the following:
If failbackThe process of restoring operations to a primary machine or facility after they have been shifted to a secondary machine or facility during Failover. failed for any of your machines, you can also troubleshoot the failure by looking at the machineA physical or virtual computer. configuration failbackThe process of restoring operations to a primary machine or facility after they have been shifted to a secondary machine or facility during Failover._hosts_settings.json file in the same folder.
Here, you can see the exact configurations of the failed machines. You can then fix any problems and use the custom failbackThe process of restoring operations to a primary machine or facility after they have been shifted to a secondary machine or facility during Failover. flow explained below to fail back these specific machines.

Select the Find machines in vCenterVMWare's virtual environment management platform. option to find machines in vCenterVMWare's virtual environment management platform.. This makes it easier to discover the disks/volumes of your machines for custom failbackThe process of restoring operations to a primary machine or facility after they have been shifted to a secondary machine or facility during Failover..

Enter a name to filter or press Enter to see all results.

Choose Yes to print your results.

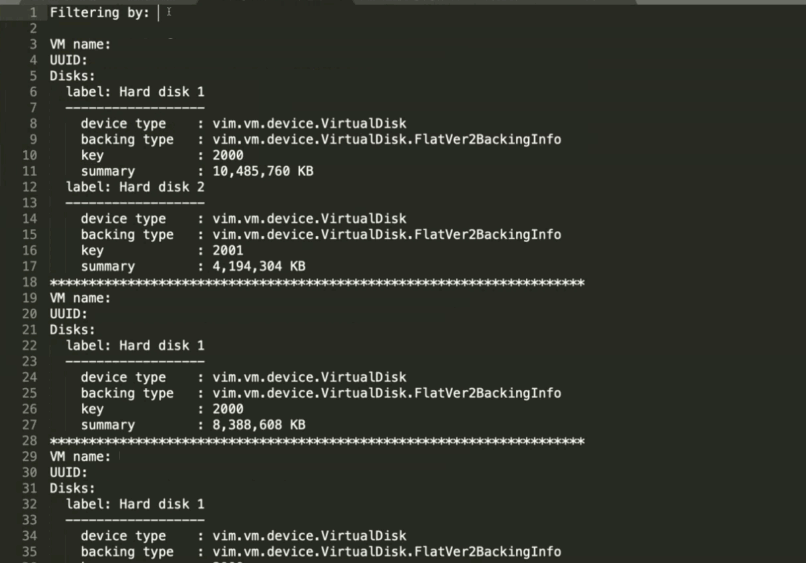
The results will be exported to the VMFinder folder in the CEFA client folder.The results will be named after the vCenterVMWare's virtual environment management platform. IP and the time stamp.
The following will be displayed for each machineA physical or virtual computer.:

©2021 COPYRIGHT CloudEndure - Terms of Service - Privacy Policy - AWS Vulnerability Reporting Guidelines - Report a Security Issue