Error: Installation Failed

Important! The information provided in this section is for general Troubleshooting guidance only. The information is provided on "AS IS" basis, with no guarantee of completeness, accuracy or timeliness, and without warranty or representations of any kind, expressed or implied. In no event will CloudEndure and/or its subsidiaries and/or their employees or service providers be liable to you or anyone else for any decision made or action taken in reliance on the information provided above or for any direct, indirect, consequential, special or similar damages (including any kind of loss), even if advised of the possibility of such damages. CloudEndure is not responsible for the update, validation or support of troubleshooting information.

When the installation of a CloudEndure AgentThe Agent is a software program that is installed on machines in the Source location that need to be migrated or replicated to the Target location. on a SourceThe location of the Source machine; Currently either a specific Region or Other Infrastructure. machines fails during the running of the CloudEndure Agent InstallerInstalls the CloudEndure Agent. file, you will receive the following message:

Installation was not finished successfully.

Please contact CloudEndure support at https://bit.ly/2T54hSc for assistance.

Make sure to attach the error string and the file cloudendure.log thatwas created in /tmp

This type of error means that the AgentThe Agent is a software program that is installed on machines in the Source location that need to be migrated or replicated to the Target location. was not installed on the Source machineThe computer, physical or virtual machine that needs to be protected by replication (Disaster Recovery) or migrated (Migration) The CloudEndure Agent is installed on the Source machine., and therefore the machineA physical or virtual computer. will not appear on the CloudEndure User ConsoleCloudEndure SaaS User Interface. A web-based UI for setting up, managing, and monitoring the Migration and Disaster Recovery solutions.. After you fix the issue that caused the installation to fail, you need to re-run the Agent InstallerInstalls the CloudEndure Agent. file to install the AgentThe Agent is a software program that is installed on machines in the Source location that need to be migrated or replicated to the Target location..

Important! When the Agent InstallerInstalls the CloudEndure Agent. file is running, a bin file is automatically created. This bin file is called cloudendure.log, and is saved at the same location as the Agent InstallerInstalls the CloudEndure Agent. file. If you were not able to locate and fix the installation error, send this log file to CloudEndure Support.

Installation Failed - AWS Replication Agent

AgentThe Agent is a software program that is installed on machines in the Source location that need to be migrated or replicated to the Target location. installation will fail if the source machineThe computer, physical or virtual machine that needs to be protected by replication (Disaster Recovery) or migrated (Migration) The CloudEndure Agent is installed on the Source machine. already has the AWS Replication AgentThe Agent is a software program that is installed on machines in the Source location that need to be migrated or replicated to the Target location. (MGN) installed on it. You will need to uninstall the AWS Replication AgentThe Agent is a software program that is installed on machines in the Source location that need to be migrated or replicated to the Target location. and then install the CloudEndure User AgentThe Agent is a software program that is installed on machines in the Source location that need to be migrated or replicated to the Target location. in order to proceed.

At times, uninstalling the AWS Replication AgentThe Agent is a software program that is installed on machines in the Source location that need to be migrated or replicated to the Target location. is not enough, as the AgentThe Agent is a software program that is installed on machines in the Source location that need to be migrated or replicated to the Target location. diver may remain. If that is the case, you will need to delete the agentThe Agent is a software program that is installed on machines in the Source location that need to be migrated or replicated to the Target location. driver manually.

Linux

Run the following command to identify the MGN driver:

lsmod | grep aws_replication_driver

Then, run the following command to delete the driver if it exists:

rmmod aws_replication_driver

Windows

Run the following command in cmd to identify the MGN drivers:

sc query AwsReplicationDriver

sc query AwsReplicationService

Then, run the following command to delete the drivers if they exists:

sc delete AwsReplicationDriver

sc delete AwsReplicationService

Installation Failed on Linux Machines - Troubleshooting

If the installation failed on a Linux Source machineThe computer, physical or virtual machine that needs to be protected by replication (Disaster Recovery) or migrated (Migration) The CloudEndure Agent is installed on the Source machine., check the following:

  1. Free disk space


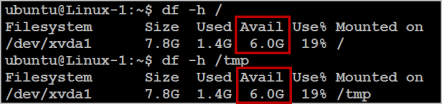
    Free disk space on the root directory – verify that you have at least 3 GB of free disk on the root directory (/) of your Source machineThe computer, physical or virtual machine that needs to be protected by replication (Disaster Recovery) or migrated (Migration) The CloudEndure Agent is installed on the Source machine.. To check the available disk space on the root directory, run the following command: df -h /
    Free disk space on the /tmp directory – for the duration of the installation process only, verify that you have at least 500 MB of free disk on the /tmp directory. To check the available disk space on the /tmp directory run the following command: df -h /tmp
    After you have entered the above commands for checking the available disk space, the results will be displayed as follows:
  2. The format of the list of disks to replicate


    During the installation, when you are asked to enter the disks you want to replicate, do NOT use apostrophes, brackets, or disk paths that do not exit. Type only existing disk paths, and separate them with a comma, as follows: /dev/xvdal,/dev/xvda2.
  3. Version of the Kernel headers package


    Verify that you have kernel-devel/linux-headers installed that are exactly of the same version as the kernel you are running.
    The version number of the kernel headers should be completely identical to the version number of the kernel.To handle this issue, follow these steps:
    1. Identify the version of your running kernel.

      To identify the version of your running kernel, run the following command:
      uname -r
      https://cloudendure.zendesk.com/hc/en-us/article_attachments/115001162265/uname.png
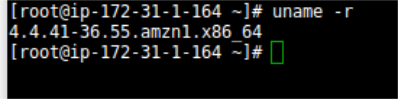
      The 'uname -r' output version should match the version of one of the installed kernel headers packages (kernel-devel-<version number> / linux-headers-<version number). 
    2. Identify the version of your kernel-devel/linux-headers.

      To identify the version of your running kernel, run the following command:
      On RHEL/CENTOS/Oracle/SUSE:
      rpm -qa | grep kernel
      https://cloudendure.zendesk.com/hc/en-us/article_attachments/115001153129/rpm.png

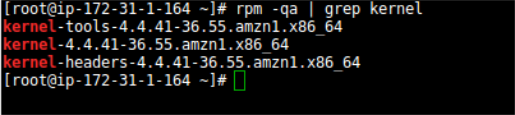
      Note: This command looks for kernel-devel.

      On Debian/Ubuntu: apt-cache search linux-headers

    3. Verifying that the folder that contains the kernel-devel/linux-headers is not a symbolic link.

      Sometimes, the content of the kernel-devel/linux-headers, which match the version of the kernel, is actually a symbolic link. In this case, you will need to remove the link before installing the required package.
      To verify that the folder that contains the kernel-devel/linux-headers is not a symbolic link, run the following command:
      On RHEL/CENTOS/Oracle/SUSE:
      ls -l /usr/src/kernels
      On Debian/Ubuntu:
      ls -l /usr/src

      In the above example, the results show that the linux-headers are not a symbolic link. 
    4. [If a symbolic link exists] Delete the symbolic link.

      If you found that the content of the kernel-devel/linux-headers, which match the version of the kernel, is actually a symbolic link, you need to delete the link. Run the following command: rm /usr/src/<LINK NAME>
      For example: rm /usr/src/linux-headers-4.4.1

    5. Install the correct kernel-devel/linux-headers from the repositories.

      If none of the already installed kernel-devel/linux-headers packages match your running kernel version, you need to install the matching package.

      Note: You can have several kernel headers versions simultaneously on your OS, and you can therefore safely install new kernel headers packages in addition to your existing ones (without uninstalling the other versions of the package.) A new kernel headers package does not impact the kernel, and does not overwrite older versions of the kernel headers.

      Note: For everything to work, you need to install a kernel headers package with the exact sameversion number of the running kernel.

      To install the correct kernel-devel/linux-headers, run the following command:
      On RHEL/CENTOS/Oracle/SUSE:
      sudo yum install kernel-devel-`uname -r`
      On Debian/Ubuntu:
      sudo apt-get install linux-headers-`uname -r`
    6. [If no matching package was found] Download the matching kernel-devel/linux-headers package.

      If no matching package was found on the repositories configured on your machineA physical or virtual computer., you can download it manually from a Linux package repository and then install it.

  4. The make, openssl, wget, curl, gcc and build-essential packages


    Note: Usually, the existence of these packages is not required for Agent installation. However, in some cases where the installation fails, installing these packages will solve the problem.


    If the installation failed, the make, openssl, wget, curl, gcc, and build-essential packages should be installed and stored in your current path.
    To verify the existence and location of the required packages, run the following command:
    which <package>
    For Example, to locate the make package:
    which make
    https://cloudendure.zendesk.com/hc/en-us/article_attachments/115001162085/whichmake.png

Error: urlopen error [Errno 110] Connection times out

This error occurs when outbound traffic is not allowed over TCP Port 443. Port 443 needs to be open outbound to the CloudEndure Service ManagerThe CloudEndure server., located at console.cloudendure.com (52.72.172.158)

Powerpath support

powermt check

If so, contact AWS Support for instructions on how to install the CloudEndure AgentThe Agent is a software program that is installed on machines in the Source location that need to be migrated or replicated to the Target location. on such machines.

Error: You need to have root privileges to run this script

Make sure you run the installer either as root or by adding sudo at the beginning:

sudo python installer_linux.py

Installation Failed on Windows Machines - Troubleshooting

If the installation failed on a Windows Source machineThe computer, physical or virtual machine that needs to be protected by replication (Disaster Recovery) or migrated (Migration) The CloudEndure Agent is installed on the Source machine., check the following:

  1. .NET Framework

    – [for replicating machines to AWS cloud only]
    Verify that .NET Framework version 3.5 or above is installed on your Windows SourceThe location of the Source machine; Currently either a specific Region or Other Infrastructure. machines.
  2. Free disk space


    Verify that there is at least 1 GB of free disk space on the root directory (C:\) of your Source machineThe computer, physical or virtual machine that needs to be protected by replication (Disaster Recovery) or migrated (Migration) The CloudEndure Agent is installed on the Source machine. for the installation.
  3. net.exe and sc.exe location 


    Verify that the net.exe and/or sc.exe files, located by default in the C:\Windows\System32 folder, are included in the PATH Environment Variable.
    1. Navigate to Control Panel > System and Security > System > Advanced system settings.
    2. On the System Properties dialog box Advanced tab, click the Environment Variables button.
    3. On the System Variables section of the Environment Variables pane, select the Path variable. Then, click the Edit button to view its contents.
    4. On the Edit System Variable pane, review the defined paths in the Variable value field. If the path of the net.exe and/or sc.exe files does not appear there, manually add it to the Variable value field, and click OK.


©2020 COPYRIGHT CloudEndure - Terms of Service - Privacy Policy - AWS Vulnerability Reporting Guidelines - Report a Security Issue